'Android_Programma'에 해당되는 글 39건

  1. 2014.06.18 Android custom Soft keyboard development
  2. 2012.10.07 JAVA 에서 PADDING 값을 내가 원하는 값으로...
  3. 2012.10.01 [ Android ] 블루투스 설정하기 Using bluetooth in Android
  4. 2012.09.16 [JAVA] 파일 전송 코드
  5. 2012.09.14 [Android] 캡쳐영상을 소켓으로 보내어 서버 화면에 띄우기
  6. 2012.09.10 [android] 전체 창 크기 구하기 whole screen size
  7. 2012.09.09 [android] inflater 사용하기
  8. 2012.09.09 [Android] 자이로 센서 사용하기
  9. 2012.08.20 [ Android ] AsyncTask 사용하기
  10. 2012.08.03 [ Android ] [펌] Service 띄워서 알람 띄우기 코드
  11. 2012.08.03 [ Android ] Service 가 떠져 있는지 안떠져 있는지 체크하기
  12. 2012.08.03 [ Android ] Notification 띄우기
  13. 2012.08.03 [ Android ] UDP Client 소스
  14. 2012.08.02 [ Android ] Custom ListView Library
  15. 2012.07.30 [ Android ] Thread 에서 Main UI 변경하기 Handler 사용하기 예제 코드
  16. 2012.07.26 [ Android ] 좀 쉽게 만든 JAVA JSON parsor CLASS
  17. 2012.07.26 [ Android , Java ] IOCP client 구현
  18. 2012.07.26 [ Android ] Thread 에서 MainActivity UI 쓰레드 참조 시 오류와 해결법
  19. 2012.07.18 [ Android ] Json 방식으로 묶기.
  20. 2012.07.10 [android] 영상처리 NDK 단에서 처리하여 리턴하기 (Image Processing in NDK) 5
  21. 2012.07.09 [android] [펌] SurfaceView 의 이해와 CameraView 띄우기
  22. 2012.07.09 [android] [펌] SurfaceView를 이용한 움직이는 공 만들기
  23. 2012.07.06 JNI 환경 구축하기
  24. 2012.06.14 [JAVA] 비동기 소켓 클라이언트 (async socket client in JAVA)
  25. 2012.03.21 android 에 phone gap 설치하기 (펌)
  26. 2012.03.21 안드로이드 가로로 돌아가는 기능 막기
  27. 2012.03.21 android json parsing .. json 파싱하기.
  28. 2012.03.21 퍼즐 슬라이딩할때 사용한 ontouchevent 사용하기.
  29. 2012.03.21 안드로이드 프로젝트 앱이름 프로젝트나 아이콘 바꾸기
  30. 2012.03.21 shared preference 입출력 (안드로이드에서 공유 환경 변수 두기)
2014. 6. 18. 23:53

생각의 정리 1. 

soft keyboard 만드는것도 일종의 앱이다. 공유메모리를 활용하면 다른 앱과의 통신도 가능할듯.. 

생각의 정리 2. 

공유메모리를 이용하면... 브라우저에 플러그인개발이 이때 들어가는군.. 그냥가져올순없나..


출처: http://www.fampennings.nl/maarten/android/09keyboard/index.htm


Maarten Pennings'
Android development: Custom keyboard
fampennings / maarten / android / 09keyboard

Custom keyboard

Download the source of this article.

1. Introduction

When using an application, we have to fill out alpha numeric fields. Since most phone or tablets don't have a full keyboard, Android offers us so called soft keyboards. In the figure below (left), we see the full keyboard on tablet. It should be noted that Android's soft keyboards are context sensitive: when the field is a phone number a different keyboard pops up (see the right figure below).
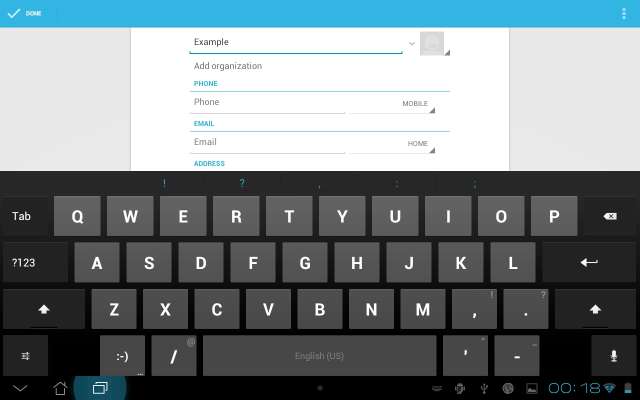
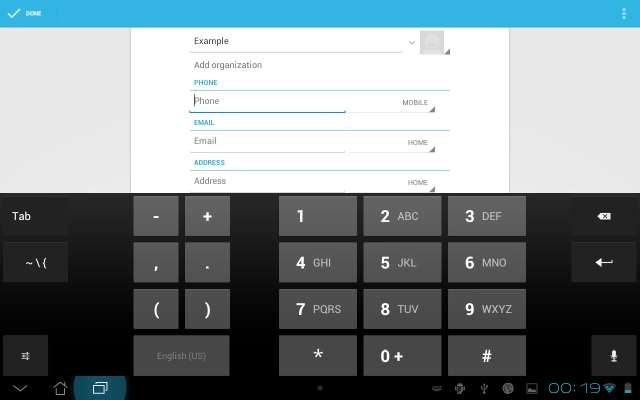
   
Entering a contact's name (left) and his phonenumber (right) with the standard Android Keyboard.

This question addressed in this article is: how can a developer offer a custom keyboard. More specifically we have a field that requires a hexadecimal number to be entered, so we are looking for a keyboard with the keys 0 to 9 and a to f.

2. Analysis

What kind of keyboards exist, next to the standard Android keyboards?

2.1. Manufacturer keyboard

One of the first things we notice on an Asus tablet is that we have the choice of using the standard Android keyboard, or using an Asus keyboard. The figure below shows the full text (left) and phone number only (right) keybaords of Asus.
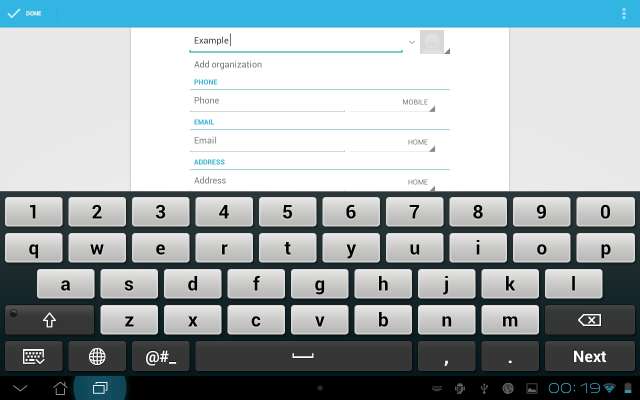
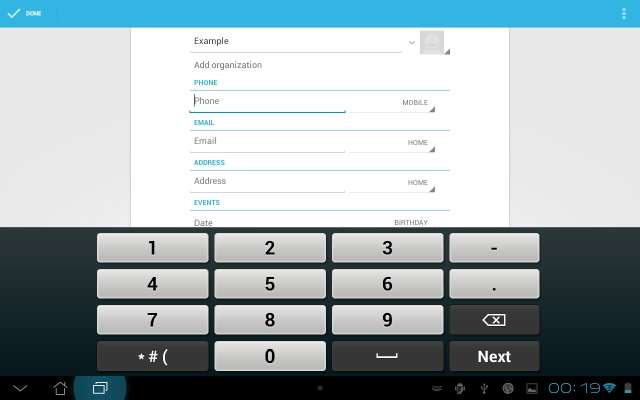
   
Entering a contact's name (left) and his phonenumber (right) using the Asus keyboard.

We see big differences. The Asus phone keyboard has fewer keys (it doesn't have the obscure -/+/,/. keys), whereas the Asus full keyboard has more keys (it does have keys for all digits).

2.2. User installed keyboard

We saw above that manufacturers have the ability to add keyboards, where they are completely free in chosing a layout. Can we do that as an end-user?

Yes!

For example, we can install the Hacker's keyboard. Please note that installing a keyboard is not without risk: all keys pass this application, and this includes your passwords!

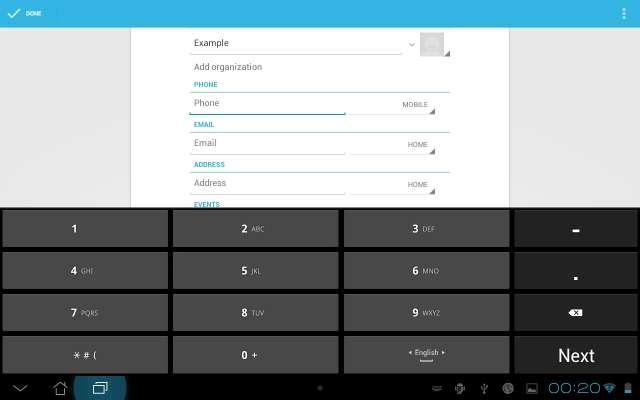
   
Entering a contact's name (left) and his phonenumber (right) using the Hacker's keyboard.

We see again big differences. Most notably, we see cursor keys and extra 'shift' keys (control and alt). And they work (including ctrl-v to paste)!

2.3. Input type

Besides the fact that a user can select which keyboard "service" (yes, each of these keyboards - Android, Asus, Hackers - runs a task) is active, we notice there is another mechanism to select which keyboard "layout" (full, phone) is chosen. Who choses that?

It's the application programmer that makes that choice. For example, an EditText has a field inputType that decides which layout to use. For example android:inputType="text" selects the full keyboard andandroid:inputType="phone" select the phone number one. See the developer site for the other types.

An no, there is no input type for hexadecimal numbers.

2.4. Dialog

Besides the keyboard services with multiple layouts, we see another approach. For examle, when we have to enter a date, we do not get a date specific keyboard, rather we get a date specific dialog. See the fgure below.
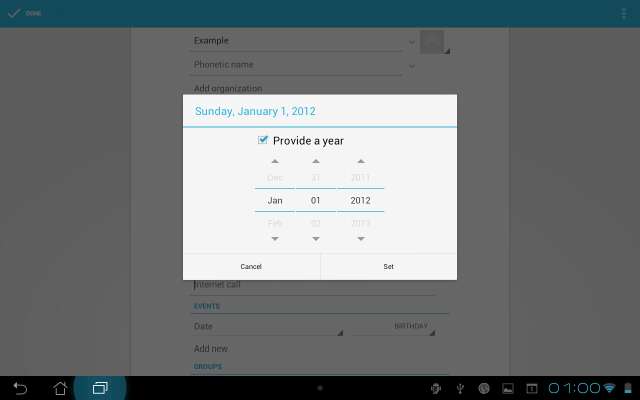

A dialog geared towards a specifc type of field (date in this case).

2.5. Conclusion

We could write our own keyboard service. But that looks like a hell of a lot of work (multiple layouts, accents, spell check support, locale specific fonts). Furthermore, it means that our customers (the end users of our app) not only have to install our app, but also the keyboard service (second apk?). They are not likely to do that, because wise users see the security issues with that. Finally, it probably will not help anyway. The reason is that there is no inputType for hexadecimal, so our app can not even request a hex layout to the keyboard service. So, writing a keyboard service is definitly a no go.

So, it looks like we are stuck with writing a dialog (just like the date picker) that has buttons for 0..9, a..f, ...

But wait, there is this badly known KeyboardView. What's that?

3. KeyboardView

Let's have a look at the KeyboardView class.

3.1. High level overview of the KeyboardView

Since API level 3, Android has a KeyboardView. As the name suggests, this is a View, so it is part of the layout of an activity. This is good news an bad news. It is bad news, because it means we have to obscure all layout files of our applications with a view for a keyboard. It is good news, because it means we are in full control in our app.

But wait, what will the KeyboardView show? The answer to this is that we have to associate a Keyboard with the KeyboardView. A keyboard consists of Rows, and rows consist of Keys, and keys are associated with alabel (what is shown on the key button) and a code (what is sent to the app when the key is pressed).

So, that's four classes to study:

But it is not that bad: a Keyboard can be setup with a single (ok, rather large) xml file. It lists all rows, their keys, and per key the label and the code. So, what we see in practice is a KeyboardView in our activity (activities), one or more xml files with a keyboard layout (in our case one file describing a hexadecimal keyboard layout), and a single line of code to assign the Keyboard to the KeyboardView. And then there are some issues in when to show the keyboard.

Let's look at the details.

3.2. Creating a KeyboardView

The KeyboardView is a View like any other, so we include it in the layout file of our activity. Nevertheless, there are a couple of noteworthy remarks; they are marked red in the code fragment below.

<RelativeLayout xmlns:android="http://schemas.android.com/apk/res/android"
    xmlns:tools="http://schemas.android.com/tools"
    android:layout_width="match_parent"
    android:layout_height="match_parent" >

    <EditText
        android:id="@+id/edittext0"
        android:layout_width="fill_parent"
        android:layout_height="wrap_content"
        android:layout_alignParentTop="true"
        android:layout_centerHorizontal="true"
        android:drawableRight="@drawable/hex"
        android:inputType="text" />

    <EditText
        android:id="@+id/edittext1"
        android:layout_width="fill_parent"
        android:layout_height="wrap_content"
        android:layout_below="@id/edittext0"
        android:layout_centerHorizontal="true"
        android:drawableRight="@drawable/txt"
        android:inputType="text" />

    ...

    <android.inputmethodservice.KeyboardView
        android:id="@+id/keyboardview"
        android:layout_width="fill_parent"
        android:layout_height="wrap_content"
        android:layout_alignParentBottom="true"
        android:layout_centerHorizontal="true"
        android:focusable="true"
        android:focusableInTouchMode="true"
        android:visibility="gone" />

</RelativeLayout>

First of all, the KeyboardView will be used to show a keyboard. Typically, keyboards are at the bottom of the screen (android:layout_alignParentBottom="true"), filling the complete width (android:layout_width="fill_parent"); this is easily achieved in RelativeLayout (maybe throw in a vertical scroll bar). Secondly, the keyboard is hidden by default (android:visibility="gone"); we use thegone value instead of invisible to completely hide it. Thirdly, the KeyboardView, for reasons unknown to me, is not part of a package that is automagically found. So, we need to add the full path (android.inputmethodservice.KeyboardView).

Unfortunately, the graphical layout editor in Eclipse cannot find that package either. So it gives an exception (java.lang.NoClassDefFoundError: Could not initialize class android.inputmethodservice.KeyboardView) and the keyboard is not shown. I have no idea how to fix that (I would expect that I could add a search path to the graphical layout editor in Eclipse). The feedback I got from Jan, is that Android Studio gives the same complaint.

3.3. Creating a Keyboard

The prevous section showed how to create a KeyboardView. This is a view, so this was most easily done in xml: the actvity has a layout file activity_main, which contains a view of type KeyboardView with idkeyboardview.

The second step is to create a Keyboard. A Keyboard is a data structure describing rows of keys, each with their label and key code. A large part is also done in xml (file hexkbd), and a small part is done programatically; see the code fragment below.

@Override protected void onCreate(Bundle savedInstanceState) {
    super.onCreate(savedInstanceState);
    setContentView(R.layout.activity_main);
    ...
    // Create the Keyboard
    Keyboard mKeyboard= new Keyboard(MainActivity,R.xml.hexkbd);

    // Lookup the KeyboardView
    KeyboardView mKeyboardView= (KeyboardView)findViewById(R.id.keyboardview);
    // Attach the keyboard to the view
    mKeyboardView.setKeyboard( mKeyboard );
    // Do not show the preview balloons
    mKeyboardView.setPreviewEnabled(false);
    ...
}

The image below shows where the two xml files (activity layout and keyboard layout) are located.
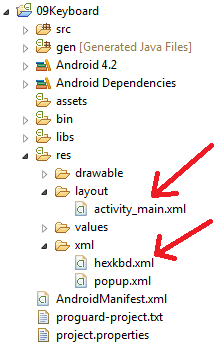

The location of the xml files.

3.4. The Keyboard xml layout file

The xml file hexkbd describes the complete keyboard. Recall that we want to make a hexadecimal keyboard, so we have relatively few keys. In order to illustrate some points, we have added a number of keys: backspace/clear all, cursor left/right, cursor begin/end, prev/next field and keyboard hide button.


The design of our hexadecimal keyboard.

Observe that we have a 'keyboard hide' button (centre of the lowest row). Many KeyboardView keyboards have this because the normal 'hide keyboard' feature in the system bar doesn't work anymore. We can see this in the figure: the bar at the bottom still shows the 'Back' soft key instead of the 'Hide keyboard' softkey.

3.4.1. Key sizes

One of the great features (I miss that in activity layouts...) is the fact that (key) sizes can be expressed in percentages relative to the parent container (by using %p as unit). This also means that we have no (ok little) worries on landscape versus portrait.

When we define a keyboard, we have three levels where we can set properties: at keyboard level, at row level, and at key level. Since most keys on a keyboard have the same size, it makes sense to set the keysize at the keyboard level, and have some overrides at key level. As we can see in the figure above, each row in our hexkbd has 3 keys, a gap of half a key, 2 keys, again a gap of half a key, and finally 2 keys. This sums up to 8 keys, so the key width is 1/8 of 100% or 12.50%. We set the key height to 10%, which means that the full keyboard (4 rows) takes 40% of the complete screen. We have two width overrides: the '0' key has double width (25%) and the 'keyboard hide' key has double width (25%). These size settings are shown in blue in the code fragment below.

<?xml version="1.0" encoding="utf-8"?>
<Keyboard xmlns:android="http://schemas.android.com/apk/res/android"
    android:keyWidth="12.50%p"
    android:keyHeight="10%p" >

    <Row>
        <Key android:codes="55"    android:keyLabel="7" android:keyEdgeFlags="left" />
        <Key android:codes="56"    android:keyLabel="8" />
        <Key android:codes="57"    android:keyLabel="9" />
        <Key android:codes="65"    android:keyLabel="A" android:horizontalGap="6.25%p" />
        <Key android:codes="66"    android:keyLabel="B" />
        <Key android:codes="-5"    android:keyIcon="@drawable/sym_keyboard_delete" android:isRepeatable="true" android:horizontalGap="6.25%p" />
        <Key android:codes="55006" android:keyLabel="CLR" android:keyEdgeFlags="right"/>
    </Row>
    <Row>
        <Key android:codes="52"    android:keyLabel="4" android:keyEdgeFlags="left"  />
        <Key android:codes="53"    android:keyLabel="5" />
        <Key android:codes="54"    android:keyLabel="6" />
        <Key android:codes="67"    android:keyLabel="C" android:horizontalGap="6.25%p" />
        <Key android:codes="68"    android:keyLabel="D" />
        <Key android:codes="55002" android:keyIcon="@drawable/sym_keyboard_left" android:isRepeatable="true" android:horizontalGap="6.25%p" />
        <Key android:codes="55003" android:keyIcon="@drawable/sym_keyboard_right" android:isRepeatable="true" android:keyEdgeFlags="right" />
    </Row>
    <Row>
        <Key android:codes="49"    android:keyLabel="1"  android:keyEdgeFlags="left" />
        <Key android:codes="50"    android:keyLabel="2" />
        <Key android:codes="51"    android:keyLabel="3" />
        <Key android:codes="69"    android:keyLabel="E" android:horizontalGap="6.25%p" />
        <Key android:codes="70"    android:keyLabel="F" />
        <Key android:codes="55001" android:keyIcon="@drawable/sym_keyboard_allleft" android:horizontalGap="6.25%p" />
        <Key android:codes="55004" android:keyIcon="@drawable/sym_keyboard_allright" android:keyEdgeFlags="right" />
    </Row>
    <Row>
        <Key android:codes="48"    android:keyLabel="0" android:keyWidth="25%p" android:horizontalGap="6.25%p" android:keyEdgeFlags="left" />
        <Key android:codes="-3"    android:keyIcon="@drawable/sym_keyboard_done" android:keyWidth="25%p" android:horizontalGap="12.50%p" />
        <Key android:codes="55000" android:keyLabel="PREV" android:horizontalGap="6.25%p" />
        <Key android:codes="55005" android:keyLabel="NEXT" android:keyEdgeFlags="right" />
    </Row>
</Keyboard>

We can also make tall keys. For example, we could add android:keyHeight="20%p" to the 'F' key, so that it becomes twice as tall. It would then overlap with the 'keyboard hide' key. To prevent that we would typically make the 'keyboard hide' key half the width (12.5%) and add a larger gap (18.75%) before 'PREV' (see below).

To make everything work across different screen sizes, you may want to put things like the keyboard's keyHeight value in device-dependent resource directories. If you use percentages for that (using "%p"), you need to create "fraction" resources (referenced by @fraction/). Thanks for the tip Jan!

3.4.2. Key gaps

Another feature is that we can offset (indent) a row of keys (as we did with the last row), or even (as we also did) add gaps to create islands of keys. Use the attribute android:horizontalGap for that, and my advise is to use percentages here too. The gap settings are shown in red in the code fragment above.

It is possible to add android:horizontalGap and/or android:verticalGap on keyboard level. This is most useful when we want to add a tiny amount of space between all keys. It is tempting to do that in pixels, but this interferes with the key size (width/height) in percentages; they no longer add up to 100%.

I cannot find the spec of horizontalGap, but as this example demonstrates, the gap is before the key that carries the horizontalGap attribute. However, when we add a horizontalGap (on Keyboard level) that is greater than 0, the horizontalGap (on Key level) no longer creates a gap before but now after the key that carries the horizontalGap attribute. To me, this looks like a bug...

Jan had a nasty surprise on his Nexus 4 with KitKat: the landscape rendering is wrong: horizontalGap is after the key, while in portrait it is before! When I tested it on a Nexus 5 with KitKat, I had a similar nasty surprise: for me the the portrait mode is wrong (gaps after key instead of before), and landscape is ok. Jan ended up adding horizontalGap attribute of 1px to Keyboard. But if the first item of the keyboard row has a drawable (as he had it in the last row; that's where he put the hide keyboard key), the behaviour reverses for that key, making it impossible to add a gap after that key...

The keyEdgeFlags are a bit magic. In all the examples I found, the attribute android:keyEdgeFlags="left" is at the left most key in a row and the android:keyEdgeFlags="right" is at the right most key. But when absent, the keyboard still layout's nicely. Because every body seems to do it, I included these flags too. The documentation suggest it has to do with handling touch events: "Flags that specify the anchoring to edges of the keyboard for detecting touch events that are just out of the boundary of the key."

3.4.3. Key labels

The next issue to settle is the labels on the buttons. There are two options: strings and drawables.

String are associated with the attribute keyLabel. As an example, consider the single character labels android:keyLabel="0" or android:keyLabel="A", or the multi character labels android:keyLabel="CLR" orandroid:keyLabel="NEXT". Jan points out that multi character labels have a smaller font than single character labels because they use labelTextSize instead of keyTextSize, see documentation.

Drawables are associated with the attribute keyIcon. As an example consider android:keyIcon="@drawable/sym_keyboard_allleft" shown below.


The drawable "sym_keyboard_allleft.png"

Please be aware that smaller screens still need some precaution. The figure below shows the same keyboard on a phone. Notice that the icons are too big (this can probably be fixed by including the icons in several resolutions in the res/drawable_xxx directories) and that even plain text labels might become too big ('prev' and 'next' are on the border).


Problems on smaller screens

I have no idea how to change the background color of some keys as is done with the shift/tab/backspace key in the standard keyboard. Will Verduzco wrote a followup article, that touches on the subject of styling.

3.4.4. Key codes

When a key is pressed,the KeyboardView calls the onKey() of its OnKeyboardActionListener. It passes the key code of the key. The key codes are declared in the xml file. For example, for the 'A' key we use the key code 65.

The keyboard is completely app specific: the application has to provide the key handling in the onKey(). This means that the key codes can be chosen freely. Nevertheless, the key handler becomes simpler if we use some standard (e.g. Unicode) for plain keys. And that's what we did in the example.

For the non plain keys (cursor movement, delete), we pick some arbitrary number; the example uses 55000 and higher.

When there is no keyCode, the KeyboardView derives a code from the label. When key android:keyLabel="A" does not have a key code, its gets 65! When key android:keyLabel="PREV" does not have a key code, its gets 80 (the Unicode of 'P' is 80). When a key does not have a code, nor a label, an exception is raised.

A nice feature is the attribute android:isRepeatable="true". It makes the key auto repeat as long as it is pressed. We have used this for the cursor movement and delete.

If we look at the details, there is some unexpected flexibility. Each key may declare a list of key codes (with a maximum of twelve?), such as android:codes="65,66,67". When the key is pressed, the onKey(int primaryCode, int[] keyCodes) is called. The array keyCodes contains this list; it is always (?) twelve integers long where the start of the list has the declared key codes and the list is padded with -1's. The first element of the list is always passed as the primaryCode parameter. The documentation explains the use: "The alternatives will include other characters that may be on the same key or adjacent keys. These codes are useful to correct for accidental presses of a key adjacent to the intended key".

3.4.5. Key popups

An advanced feature is that a key can have a popup. It appears when the key is long pressed. This feature is known from the standard Android keyboard as well: the popup shows alternative keys. For example, a long press on 'e' typically shows 'é', 'è', 'ë' etc.


A popup for the 'A' key (on long press), the generic way

There are two ways to make a popup keyboard: generic and dedicated.

The dedicated way is to add an element to a key specifying a keyboard layout for the popup keyboard. For example, we could add android:popupKeyboard="@xml/newkeyboard" to some key. This requires an xml filenewkeyboard which has all the features of the main keyboard.

The generic way is to add an element to a key specifying the labels (with implict codes) of the popup keys. For example, we could add android:popupCharacters="aA" to the 'A' key. This does require require an xml file, but only with keyboard level attributes.

The key is decorated as follows.

<Key android:codes="65" android:keyLabel="A" android:popupKeyboard="@xml/popup" android:popupCharacters="aA" >

The popup.xml has the following content.

<?xml version="1.0" encoding="utf-8"?>
<Keyboard xmlns:android="http://schemas.android.com/apk/res/android"
    android:keyWidth="10%p"
    android:keyHeight="10%p">
</Keyboard>

3.5. The key handler

We have to write the key handler ourselves. For this, we add the red code to the creation of the keyboard.

// Create the Keyboard
Keyboard mKeyboard= new Keyboard(MainActivity,R.xml.hexkbd);

// Lookup the KeyboardView
KeyboardView mKeyboardView= (KeyboardView)findViewById(R.id.keyboardview);
// Attach the keyboard to the view
mKeyboardView.setKeyboard( mKeyboard );

// Install the key handler
mKeyboardView.setOnKeyboardActionListener(mOnKeyboardActionListener);
...
}

As mentioned above, the OnKeyboardActionListener has an onKey(), but it has many more methods.

private OnKeyboardActionListener mOnKeyboardActionListener = new OnKeyboardActionListener() {
    @Override public void onKey(int primaryCode, int[] keyCodes) {
    }

    @Override public void onPress(int arg0) {
    }

    @Override public void onRelease(int primaryCode) {
    }

    @Override public void onText(CharSequence text) {
    }

    @Override public void swipeDown() {
    }

    @Override public void swipeLeft() {
    }

    @Override public void swipeRight() {
    }

    @Override public void swipeUp() {
    }
};

We only override the onKey(). It searches for the view in focus (if it is not an EditText, we abort). Then it executes an action based on the actual key code (for a list of key codes, see below).

@Override public void onKey(int primaryCode, int[] keyCodes) {
    // Get the EditText and its Editable
    View focusCurrent = MainActivity.this.getWindow().getCurrentFocus();
    if( focusCurrent==null || focusCurrent.getClass()!=EditText.class ) return;
    EditText edittext = (EditText) focusCurrent;
    Editable editable = edittext.getText();
    int start = edittext.getSelectionStart();
    // Handle key
    if( primaryCode==CodeCancel ) {
        hideCustomKeyboard();
    } else if( primaryCode==CodeDelete ) {
        if( editable!=null && start>0 ) editable.delete(start - 1, start);
    } else if( primaryCode==CodeClear ) {
        if( editable!=null ) editable.clear();
    } else if( primaryCode==CodeLeft ) {
        if( start>0 ) edittext.setSelection(start - 1);
    } else if( primaryCode==CodeRight ) {
        if (start < edittext.length()) edittext.setSelection(start + 1);
    } else if( primaryCode==CodeAllLeft ) {
        edittext.setSelection(0);
    } else if( primaryCode==CodeAllRight ) {
        edittext.setSelection(edittext.length());
    } else if( primaryCode==CodePrev ) {
        View focusNew= edittext.focusSearch(View.FOCUS_BACKWARD);
        if( focusNew!=null ) focusNew.requestFocus();
    } else if( primaryCode==CodeNext ) {
        View focusNew= edittext.focusSearch(View.FOCUS_FORWARD);
        if( focusNew!=null ) focusNew.requestFocus();
    } else {// Insert character
        editable.insert(start, Character.toString((char) primaryCode));
    }
}

The key codes are the codes used in the xml file; they have constants in the java class.

public final static int CodeDelete   = -5; // Keyboard.KEYCODE_DELETE
public final static int CodeCancel   = -3; // Keyboard.KEYCODE_CANCEL
public final static int CodePrev     = 55000;
public final static int CodeAllLeft  = 55001;
public final static int CodeLeft     = 55002;
public final static int CodeRight    = 55003;
public final static int CodeAllRight = 55004;
public final static int CodeNext     = 55005;
public final static int CodeClear    = 55006;

3.6. When to show or hide the custom keyboard

One of the hardest issues with the KeyboardView is making it visible at the right time. There is only one thing harder: making the standard keyboard invisible at the same time!

Let's start by writing the methods that show respectively hide the custom keyboard. After that, we focus on when to call them.

public void hideCustomKeyboard() {
    mKeyboardView.setVisibility(View.GONE);
    mKeyboardView.setEnabled(false);
}

public void showCustomKeyboard( View v ) {
    mKeyboardView.setVisibility(View.VISIBLE);
    mKeyboardView.setEnabled(true);
    if( v!=null ) ((InputMethodManager)getSystemService(Activity.INPUT_METHOD_SERVICE)).hideSoftInputFromWindow(v.getWindowToken(), 0);
}

public boolean isCustomKeyboardVisible() {
    return mKeyboardView.getVisibility() == View.VISIBLE;
}

The showCustomKeyboard() will be called when and EditText is getting focus. We not only show the custom keyboard, but also actively switch off the standard keyboard.

Now to when to show or hide the custom keyboard. The model that we use is that our custom keyboard is "coupled" to one (or more) EditTexts. When a "coupled" EditText has focus the custom keyboard should be visible. By setting the OnFocusChangeListener of the EditText, we can show the custom keyboard when the edit box gets focus, but also hide it when the edit box loses focus.

// Find the EditText
EditText edittext= (EditText)findViewById(...);

// Make the custom keyboard appear
edittext.setOnFocusChangeListener(new OnFocusChangeListener() {
    @Override public void onFocusChange(View v, boolean hasFocus) {
        if( hasFocus ) showCustomKeyboard(v); else hideCustomKeyboard();
    }
});

However, this listener only gets called at the transition of getting (or losing) focus. If the EditText has focus, but the keyboard is hidden (e.g. after pressing the hide keyboard button) how can the user make it visible again? The standard keyboard allows a re-tap of the EditText in focus. Let's mimick that.

edittext.setOnClickListener(new OnClickListener() {
    @Override public void onClick(View v) {
        showCustomKeyboard(v);
    }
});

We are nearly there. When our activity starts, with a coupled EditText in focus, the standard keyboard is displayed. If have no idea why, I would expect the last statement in showCustomKeyboard() would have hidden it, but it hasn't. We add one more line (the red one) to the creation of the keyboard.

// Create the Keyboard
Keyboard mKeyboard= new Keyboard(MainActivity,R.xml.hexkbd);

// Lookup the KeyboardView
KeyboardView mKeyboardView= (KeyboardView)findViewById(R.id.keyboardview);
// Attach the keyboard to the view
mKeyboardView.setKeyboard( mKeyboard );

// Install the key handler
mKeyboardView.setOnKeyboardActionListener(mOnKeyboardActionListener);

// Hide the standard keyboard initially
getWindow().setSoftInputMode(WindowManager.LayoutParams.SOFT_INPUT_STATE_ALWAYS_HIDDEN);
...
}

As a final step, we would like the back button of the activity to close the custom keyboard (if it is open). Therefore, we add the following code to our activity.

@Override public void onBackPressed() {
    if( isCustomKeyboardVisible() ) hideCustomKeyboard(); else this.finish();
}

Still, Android is persistent in poping up the standard keybaord. There is one certain way to stop Android doing this: add edittext.setInputType(InputType.TYPE_NULL) to tell Android that we won't be doing any editing on the EditText. However, this has one small issue, Android won't be showing a cursor. And no, edittext.setCursorVisible(true) doesn't help (I consider this a bug).


A cursor in an EditText.

If you don't need a cursor, you're done. But we want a cursor: we have added cursor keys in our custom keyboard. So, we can not set the input type to null, we set it to text. As a result, we have to standard keyboard poping up.

I found the following work around on the web (forgot where...). The trick is to have the input type set to text (so that the cursor is always visible), but just before a key press, we set input type to none and call the base class handler. This way, the base class handler only sees input type none and does not pop up the standard keyboard.

edittext.setOnTouchListener(new OnTouchListener() {
    @Override public boolean onTouch(View v, MotionEvent event) {
        EditText edittext = (EditText) v;
        int inType = edittext.getInputType();       // Backup the input type
        edittext.setInputType(InputType.TYPE_NULL); // Disable standard keyboard
        edittext.onTouchEvent(event);               // Call native handler
        edittext.setInputType(inType);              // Restore input type
        return true; // Consume touch event
    }
});

3.7. But I have multiple EditTexts

It is not uncommon that multiple EditTexts need the same custom keyboard. We can solve that be writing all EditText related code in a registerEditText method, and call it for all the EditTexts that need the keyboard.

public void registerEditText(int resid) {
    // Find the EditText 'resid'
    EditText edittext= (EditText)findViewById(resid);
    // Make the custom keyboard appear
    edittext.setOnFocusChangeListener(new OnFocusChangeListener() {
        @Override public void onFocusChange(View v, boolean hasFocus) {
            if( hasFocus ) showCustomKeyboard(v); else hideCustomKeyboard();
        }
    });
    edittext.setOnClickListener(new OnClickListener() {
        @Override public void onClick(View v) {
            showCustomKeyboard(v);
        }
    });
    // Disable standard keyboard hard way
    edittext.setOnTouchListener(new OnTouchListener() {
        @Override public boolean onTouch(View v, MotionEvent event) {
            EditText edittext = (EditText) v;
            int inType = edittext.getInputType();       // Backup the input type
            edittext.setInputType(InputType.TYPE_NULL); // Disable standard keyboard
            edittext.onTouchEvent(event);               // Call native handler
            edittext.setInputType(inType);              // Restore input type
            return true; // Consume touch event
        }
    });
    // Disable spell check (hex strings look like words to Android)
    edittext.setInputType( edittext.getInputType() | InputType.TYPE_TEXT_FLAG_NO_SUGGESTIONS );
}

4. Convert to a class

To make it easier to use a custom keyboard; we can move all keyboard code to a seperate class.

package nl.fampennings.keyboard;
...

class CustomKeyboard {

    private KeyboardView mKeyboardView;
    private Activity     mHostActivity;

    private OnKeyboardActionListener mOnKeyboardActionListener = new OnKeyboardActionListener() {
        @Override public void onKey(int primaryCode, int[] keyCodes) {
            ...
        }
        ...
    };

    public CustomKeyboard(Activity host, int viewid, int layoutid) {
        ...
    }

    public boolean isCustomKeyboardVisible() {
        ...
    }

    public void showCustomKeyboard( View v ) {
        ...
    }

    public void hideCustomKeyboard() {
        ...
    }

    public void registerEditText(int resid) {
        ...
    }

}

The activity then just registers the EditTexts.

package nl.fampennings.keyboard;

import android.app.Activity;
import android.os.Bundle;

public class MainActivity extends Activity {

    CustomKeyboard mCustomKeyboard;

    @Override protected void onCreate(Bundle savedInstanceState) {
        super.onCreate(savedInstanceState);
        setContentView(R.layout.activity_main);

        mCustomKeyboard= new CustomKeyboard(this, R.id.keyboardview, R.xml.hexkbd );

        mCustomKeyboard.registerEditText(R.id.edittext0);
        // mCustomKeyboard.registerEditText(R.id.edittext1);
        // mCustomKeyboard.registerEditText(R.id.edittext2);
        mCustomKeyboard.registerEditText(R.id.edittext3);
        mCustomKeyboard.registerEditText(R.id.edittext4);
    }

    @Override public void onBackPressed() {
        if( mCustomKeyboard.isCustomKeyboardVisible() ) mCustomKeyboard.hideCustomKeyboard(); else this.finish();
    }

}

Download the source of this article.

Posted by k1rha
2012. 10. 7. 12:36

패킷을 전송할때 특정바이트만큼 전송을 시키고 문자열을 자르고 싶었다.(JSON 형식.)

이러한 경우 특정 바이트 크기를 잡고 좌측이나 우측에 패딩값을 넣고 전송하고 split 해주면된다.


한데 패딩에 대한 자료가 없던중 한참을 뒤져서 나온 아래와 같은 방법! 왜 공백을 replace 할 생각을 못했을까 바보같아 ㅠ


public class Test {

  public static void main(String args[]) throws Exception {
    System.out.println(String.format("%1024s", "howto").replace(' ', '*'));
    System.out.println(String.format("%-1024s", "howto").replace(' ', '*'));
  }

/*  output

*****howto
howto*****

*/

}

Posted by k1rha
2012. 10. 1. 18:47

[출처 :  정말 죄송합니다 복사하고 어딘지 놓쳤습니다. 알려주시면 감사하겠습니다. ]


블루투스 권한 설정


앱에서 블루투스 기능을 사용하기 위해서는 먼저 적어도 BLUETOOTH, BLUETOOTH_ADMIN 중 하나는 선언해야 한다.

연결, 연결 수락, 데이터 교환 등의 블루투스 통신을 진행하고 싶으면 BLUETOOTH 권한을 요청해야 하며 블루투스 설정을 조작하거나 초기 장비를 검색하기 위해서는 BLUETOOTH_ADMIN 권한을 요청해야 한다.


대부분의 앱은 로컬 블루투스 장비들을 검색하기 위해 전적으로 이 권한을 필요하다. 만약 사용자가 블루투스 설정을 변경하는 파워 관리자일 필요가 없다면 이 권한을 요청할 필요는 없다. 만약 BLUETOOTH_ADMIN 권한을 가지면 BLUETOOTH 권한에서 허가된 기능도 수행할 수 있다.


앱의 매니페스트에 블루투스 권한을 선언은 다음과 같이 <uses-permission> 엘리먼트를 사용하면 된다.


<manifest ...]] >

<uses-permission android:name="android.permission.BLUETOOTH"/>

...

</manifest>


블루투스 설정


앱이 블루투스 상에서 통신을 하기 이전에 먼저 블루투스가 장비에서 지원하는지와 활성화되어 있는지를 검증해야 한다.


만약 블루투스가 지원되지 않는다면 앱의 어떠한 블루투스 기능도 자연스럽게 비활성화 시켜야 하며 만약 블루투스가 지원되지만 비활성화되어져 있다면 앱을 떠나지 않고 블루투스를 활성화 시키도록 요청할 수 있다.


이러한 작업은 BluetoothAdapter 를 사용하여 처리한다.


1. BluetoothAdapter 획득


BluetoothAdapter는 어떠한 블루투스 액티비티에서 요청할 수 있다. BluetoothAdpater를 얻기 위해서는 static getDefaultAdapter() 메서드를 호출한다. 이 메서드는 장비가 소유하고 있는 블루투스 어댑터에 대한 BluetoothAdapter 객체를 반환하며 이 어댑터는 전체 시스템에서 하나만 존재한다. 그리고 앱은 이 객체를 사용하여 어댑터와 연동할 수 있다. 만약 getDefaultAdapter()가 null을 반환하면 장비는 블루투스를 지원하지 않는 것이며 블루투스에 관한 어떠한 작업도 할 수 없다.


BluetoothAdapter mBluetoothAdapter = BluetoothAdapter.getDefaultAdapter();
if (mBluetoothAdapter == null) {
    // Device does not support Bluetooth
}


2. 블루투스 활성화


다음으로 블루투스를 활성화 시켜야 하는데 먼저 isEnabled() 메서드를 통해 현재 활성화 상태인지를 확인할 수 있다. 만약 false이면 블루투스가 비활성화 되어져 있는 것으로 활성화 상태로 변경하려면 ACTION_REQUEST_ENABLE 액션 인텐트와 함께 startActivityForResult()를 호출해야 한다. 이것은 앱의 중지 없이 시스템의 설정을 통해 블루투스를 활성화 시키는데 목적이 있는 요청이다.

if (!mBluetoothAdapter.isEnabled()) {
    Intent enableBtIntent = new Intent(BluetoothAdapter.ACTION_REQUEST_ENABLE);
    startActivityForResult(enableBtIntent, REQUEST_ENABLE_BT);
}


위의 코드가 실행되면 블루투스를 활성화 시키기 위한 사용자 권한을 요청하는 다이얼로그 장이 표시되며 사용자가 "Yes"를 선택하면 시스템은 블루투스를 활성화 시키는 작업을 수행하며 활성화가 완료되면 앱으로 다시 복귀된다.


만약 블루투스 활성화가 성공하면 복귀된 액티비티는 OnActivityResult() 메서드에서 result code에 RESULT_OK를 받을 것이고 만약 "No"를 선택하여 블루투스를 활성화 시키지 않았다면 result code는 RESULT_CANCELED 이다.


옵션으로 앱은 시스템에서 블루투스 상태가 변경되는 사항을 알아내기 위해 ACTION_STATE_CHANGED 브로드캐스트 인텐트를 받을 수 있도록 설정할 수 있다. 이 브로드캐스트는 EXTRA_STATE와 EXTRA_PREVIOUS_STATE 에 대한 정보가 포함되어져 있으며 이는 각각 이전과 새롭게 설정된 상태를 나타낸다. 이 extra 데이터에 허용되는 값은 STATE_TURNING_ON, STATE_ON, STATE_TURNING_OFF, STATE_OFF 가 있으며 이 데이터를 앱이 실행되고 있는 동안 블루투스 상태가 변화되는 것을 대처할 수 있다.


검색 활성화를 동작 시키면 자동으로 블루투스가 활성화될 것이다. 만약 이것을 블루투스 액티비티가 진행되기 전에 설정하면 2. 블루투스 활성화는 처리하지 않아도 된다.


창비 찾기


BluetoothAdapter를 사용하면 장비 탐색 혹은 페어링된 장비리스트를 질의하는 방법으로 원격의 블루투스 장비들을 찾을 수 있다.


장비 탐색은 로컬 영역에서 활성화된 블루투스 장비를 찾는 스캐닝 작업을 수행하고 각각에 대해 몇가지 정보를 요청한다. (때때로 이것은 발견, 탐구 혹은 스캔닝 이라고 한다.) 그러나 이것도 로컬 영역 내의 블루투스 장비가 탐색시 발견될 수 있도록 활성화 되어져 있을 때만 가능하다.


만약 장비가 탐색되면 장비 이름, 클래스 그리고 유일한 MAC 주소와 같은 공유 정보를 가지고 탐색 요청에 대해 응답할 것이다. 이 정보는 탐색 작업을 수행중인 장비는 탐색된 장비와의 연결을 초기화하는데 사용할 수 있다.


처음으로 원격 장비와 연결자를 만들 때 사용자에게 자동으로 페어링 요청이 보여진다. 장비가 페어링될 때 장비의 기본 정보(장비 이름, 클래스 그리고 MAC 주소)는 저장되고 그후 블루투스 API들을 통해 읽을 수 있다.


원격 장비가 잘 알려진 MAC 주소를 사용할 경우 같은 범위안에 있다면 연결자를 탐색 작업 없이 어떤때든지 초기화할 수 있다.


페어링됨과 연결됨의 차잇점을 알아야 한다. 페어링된다는 것은 2개의 장비가 인증에서 사용할 수 있는 link-key 를 공유하고 각각 상대방과 암호화된 연결자를 수립할 수 있는 조건을 갖추는 등 서로의 존재를 아는 것을 말한다.


연결된다는 것은 장비가 현재 RFCOMM 채널을 공유하고 각각의 장비 간에 데이터를 송수신할 수 있는 것을 말한다.

현재 안드로이드 블루투스 API들은 장비들이 RFCOMM 연결이 되기 이전에 페어링되기를 요청하고 있다. (페어링은 당신이 블루투스 API들을 이용해 암호화된 연결자를 초기화할 때 자동으로 진행된다.)


다음 섹션은 페어링된 장비들을 찾는 방법과 장비 탐색을 통해 새로운 장비를 탐색하는 것을 설명하겠다.


참고

안드로이드 장비는 기본적으로 탐색되지 않게 되어져 있다. 사용자는 환경설정을 통해 제한된 시간동안 장비가 탐색될 수 있도록 하거나 앱이 앱의 동작을 멈추지 않고 사용자가 탐색 기능을 활성할 수 있도록 요청할 수 있다.


페어링된 장비들을 질의하기


장비 탐색을 진행하기에 앞서 만약 연결하고자 하는 장비가 이미 페어링된 것인지를 페어링된 장비들의 집합을 질의할 필요가 있다. 이 작업은 getBondedDevices() 메서드를 호출하는 것으로 페어링된 장비들을 나타내는 BluetoothDevice들의 집합을 반환한다. 예를 들어 다음은 모든 페어링된 장비들을 질의하고 사용자에게 ArrayAdapter를 이용하여 장비의 이름을 보여주는 코드이다.


Set<BluetoothDevice> pairedDevices = mBluetoothAdapter.getBondedDevices();
// If there are paired devices
if (pairedDevices.size() > 0) {
    // Loop through paired devices
    for (BluetoothDevice device : pairedDevices) {
        // Add the name and address to an array adapter to show in a ListView
        mArrayAdapter.add(device.getName() + "\n" + device.getAddress());
    }
}


BluetoothDevice 객체로 부터 연결을 위해 필요한 것은 MAC 주소이다. 여기서는 단순히 사용자에게 장비의 MAC 주소를 표시하지만 뒤에 연결을 초기화하는 데 사용하되는 것을 자세히 살펴보도록 하겠다.


장비들 탐색


장비 탐색을 시작하기 위해서는 단순히 startDiscovery() 를 호출하면 된다. 이 메서드의 진행은 비동기적이고 탐색이 성공적으로 시작되었는지 아닌지에 대한 boolean 형식의 결과값을 반환한다. 탐색 작업은 보통 12초 정도이며 페이지에는 스캔해서 찾은 장비들의 블루투스 이름을 표시한다.


앱은 각 장비 탐색에 대한 정보를 받으려면 ACTION_FOUND 인텐트에 대한 브로드캐스트 리시버를 등록해야 한다. 장비를 찾을 때마다 시스템은 ACTION_FOUND 인텐트를 브로드캐스트 한다.이 인텐트는 BluetoothDevice 객체가 있는 EXTRA_DEVICE와 BluetoothClass 객체가 있는 EXTRA_CLASS 를 포함하고 있다.


브로드캐스트 리시버에 대한 예제는 다음과 같다.

// Create a BroadcastReceiver for ACTION_FOUND
private final BroadcastReceiver mReceiver = new BroadcastReceiver() {
    public void onReceive(Context context, Intent intent) {
        String action = intent.getAction();
        // When discovery finds a device
        if (BluetoothDevice.ACTION_FOUND.equals(action)) {
            // Get the BluetoothDevice object from the Intent
            BluetoothDevice device = intent.getParcelableExtra(BluetoothDevice.EXTRA_DEVICE);
            // Add the name and address to an array adapter to show in a ListView
            mArrayAdapter.add(device.getName() + "\n" + device.getAddress());
        }
    }
};
// Register the BroadcastReceiver
IntentFilter filter = new IntentFilter(BluetoothDevice.ACTION_FOUND);
registerReceiver(mReceiver, filter); // Don't forget to unregister during onDestroy


연결을 초기화하는데 필요한 정보인 MAC 주소는 BluetoothDevice 객체에 있다.


주의

장비 탐색 진행은 블루투스 어댑터에게 무겁고 많은 자원을 소비하는 작업이다. 당신이 연결하기 위한 장비를 찾았다면 항상 연결을 시도하기 전에 cancelDiscovery() 호출을 통해 탐색 작업을 중지시켜야 한다. 또한 만약 장비와 연결시 장비 탐색을 중지시키지 않는다면 연결에 대한 대역폭 활용을 감소시키므로 반드시 연결되어있는 동안은 탐색 작업이 되지 않도록 해야 한다.


탐색 활성화


만약 장비를 다른 장비들에 탐색될 수 있도록 만들고 싶다면 ACTION_REQUEST_DISCOVERABLE 액션 인텐트와 함께 startActivityForResult(Intent, int)를 호출한다. 이것은 앱이 중지되지 않고 환경설정의 탐색 모드를 활성화 시킨다.


기본적으로 장비는 120초 동안 탐색될 수 있는 상태가 되지만 이를 변경하고 싶다면 EXTRA_DISCOVERABLE_DURATION의 extra 값을 인텐트에 추가하여 호출하면 된다. 앱은 최고 3600 초을 설정할 수 있다. 그리고 0값이면 항상 탐색 모드를 유지하겠다는 의미이다. 만약 0미만이거나 3600 보다 크면 자동으로 120초로 설정된다.


다음은 300초로 설정하는 예제이다.


Intent discoverableIntent = new
Intent(BluetoothAdapter.ACTION_REQUEST_DISCOVERABLE);
discoverableIntent.putExtra(BluetoothAdapter.EXTRA_DISCOVERABLE_DURATION, 300);
startActivity(discoverableIntent);


위의 코드가 실행되면 다음과 같이 장비가 탐색될 수 있도록 하는 사용자 권한을 요청하는 다이얼로그가 보여지며 "Yes"를 선택하면 특정한 시간(여기서는 300초)동안 탐색 가능 상태가 된다.


사용자의 선택 결과 값은 액티비티의 onActivityResult()를 통해 전달 받으며 사용자가 "No"를 선택했거나 에러가 발생했으면 Activity.RESULT_CANCELED 가 결과 코드로 전달될 것이다.


참고

만약 블루투스가 장비에 활성화되어 있지 않다면 장비 탐색 가능 모드 작업은 자동으로 활성화 시킬 것이다.


장비는 자동으로 일정 시간동안 탐색 가능 모드를 유지할 것이고 만약 탐색 가능 모드에 대한 설정이 변하는 것을 알아내고 싶다면 ACTION_SCAN_MODE_CHANGED 인텐트에 대한 브로드캐스트 리시버를 등록하면 된다.


전달되는 인텐트안에는 현재의 스캔 모드인 EXTRA_SAN_MODE 와 이전 스캔 모드인 EXTRA_PREVIOUS_SCAN_MODE가 있다. 여기에 가능한 값은 SCAN_MODE_CONNECTABLE_DISCOVERABLE, SCAN_MODE_CONNECTABLE 또는 SCAN_MODE_NONE 이다. 이것은 각각 탐색 가능 모드, 연결을 받아들일 수 있는 탐색 불가능 모드, 연결을 받아들일 수 없는 탐색 불가능 모드를 나타낸다.


만약 원격 장비와 연결을 초기화 할 것이면 장비 탐색을 활성화할 필요는 없다. 앱은 원격 장비를 탐색하여 연결을 초기화할 수 있기 때문에 장비 탐색 활성화는 오직 앱에서 서버 소켓을 통해 연결을 수락할 때에만 필요하다.


장비와의 연결


2개의 장비에서 실행되고 있는 앱 사이 연결자를 생성하기 위해서는 서버 사이드와 클라이언트 사이드를 구현해야 한다.


하나의 장비는 서버 소켓을 열고 다른 한 장비는 서버 장비의 MAC 주소를 사용하여 연결자를 초기화해야 한다. 서버와 클라이언트는 같은 RFCOMM 채널에 대한 연결된 BluetoothSocket을 가질 때 연결되었다고 할 수 있으며 이것을 통해 각 장비는 input과 output 스트림들을 얻어 데이터 전송을 시작할 수 있다. 이것에 대한 것은 연결자 관리에서 자세히 설명하고 여기서는 2개의 장비간에 연결자를 초기화하는 법을 살펴보겠다.


서버 장비와 클라이언트 장비는 각각 다른 방법으로 BluetoothSocket을 얻는다. 서버는 연결을 받아들일 때 얻고 클라이언트는 서버에 대한 RFCOMM 채널을 오픈할 때 얻는다.


구현 기술 중 하나는 각각 장비가 서버 소켓을 오픈하고 연결 요청을 수락하는 서버와 같이 준비시키고 그 다음 장비들은 상대방 장비와 클라이언트로서 연결을 시작하는 것이다. 아니면 다른 구현 방법은 명시적으로 "host" 로서 수용하는 서버 소켓을 오픈하고 다른 장비는 단순히 연결을 시작하는 것이다.


참고

만약 2개의 장비가 이전에 페어링되지 않았다면 안드로이드 프레임워크는 자동으로 페어링 요청 노티피케이션을 보여주거나 연결을 수행하는 동안 사용자에게 다이얼로그를 보여준다. 그래서 장비들에 연결하기 위해 수락될 때 앱은 장비들이 페어링되었는지 아닌지를 신경쓸 필요가 없다. RFCOMM 연결은 사용자가 성공적으로 페어링될 때 까지 블럭킹되거나 사용자의 페어링 취소 혹은 타임 아웃으로 실패될 것이다.


서버로 연결


2개의 장비를 연결하려면 하나는 서버로서 BluetoothServerSocket을 오픈하여야 한다.

서버 소켓은 연결 요청을 듣기 위함이고 하나가 연결을 될 때 연결된 BluetoothSocket을 제공받는다.

BluetoothSocket이 BluetoothServerSocket으로 부터 획득되면 BluetoothServerSocket은 더이상 연결을 받지 않아도 된다면 폐기시켜도 괜찮다.


서버 소켓을 설정하고 연결을 수락하는 방법은 다음과 같다.


1. listenUsingRfcommWithServiceRecord(String, UUID)메서드를 호출하여 BluetoothServerSoket을 얻는다.

listenUsingRfcommWithServiceRecord(String, UUID)메서드의 String 형식의 파라메터는 앱에서 제공하는 서비스를 구분시킬 수 있는 문자열로서 시스템은 자동으로 장비에 Service Discovery Protocol(SDP) 데이터베이스 엔트리를 저장한다. (이름은 문자를 사용하면 되고 단순히 앱의 이름을 사용해도 된다.) UUID는 또한 SDP 엔트리 안에 포함되어 저장되고 클라이언트 장비에 대한 연결 동의에 대해 기본 정보가 된다. 클라이언트는 연결을 원하는 서비스을 유일하게 구분하는 UUID 정보를 함께 보내 이 장비에 연결을 시도할 것이다. UUID가 매칭이 될 때 연결이 수락된다.

UUID에 대해서

Universally Unique Identifier(UUID)는 정보가 유일하게 구분되게 하는데 사용되는 문자열로 된 ID로 128-bit 형식을 가져야 한다.UUID의 포인트는 랜덤으로 선택해도 충돌하지 않을 정도로 충분히 크다는 것이다. 이 경우에는 앱의 블루투스 서비스를 구분하는데 사용하는 것이다. 당신은 UUID 클래스의 fromString(String)을 사용하여 생성할 수 있다.


2. accept() 메서드를 호출하여 연결 요청을 듣기 시작한다.


이것은 블럭킹 호출이며 연결이 수락되거나 예외사항이 발생할 때 반환한다.

연결은 원격 장비가 서버 소켓을 생성할 때 등록한 UUID와 매칭되는 UUID를 가지고 연결 요청을 보낼 때만 연결을 수락한다. accept()는 연결을 수락하면 원격 장비와 연결된 BluetoothSocket 객체를 반환한다.


3. 만약 추가적인 연결을 수락하지 않으려면 close() 메서드를 호출한다.


이 메서드는 서버 소켓을 릴리즈 하고 모든 자원을 시스템을 반환한다. 그러나 accept()에 의해 반환된 연결된 BluetoothSocket은 종료되지 않는다.

이러한 모든 BluetoothServerSocket 혹은 BluetoothSocket에 관한 작업은 앱에서 별도의 쓰레드를 사용하여 처리한다. BluetoothServerSocket과 BluetoothSocket의 모든 메서드들은 thread-safe 하다.

다음은 쓰레드로 연결을 수락하는 서버 컴포넌트를 구현한 예제이다.


private class AcceptThread extends Thread {
    private final BluetoothServerSocket mmServerSocket;

    public AcceptThread() {
        // Use a temporary object that is later assigned to mmServerSocket,
        // because mmServerSocket is final
        BluetoothServerSocket tmp = null;
        try {
            // MY_UUID is the app's UUID string, also used by the client code
            tmp = mBluetoothAdapter.listenUsingRfcommWithServiceRecord(NAME, MY_UUID);
        } catch (IOException e) { }
        mmServerSocket = tmp;
    }

    public void run() {
        BluetoothSocket socket = null;
        // Keep listening until exception occurs or a socket is returned
        while (true) {
            try {
                socket = mmServerSocket.accept();
            } catch (IOException e) {
                break;
            }
            // If a connection was accepted
            if (socket != null) {
                // Do work to manage the connection (in a separate thread)
                manageConnectedSocket(socket);
                mmServerSocket.close();
                break;
            }
        }
    }

    /** Will cancel the listening socket, and cause the thread to finish */
    public void cancel() {
        try {
            mmServerSocket.close();
        } catch (IOException e) { }
    }
}


위의 예제는 오직 하나의 연결만 허용하는데 연결이 수락되자 마자 BluetoothSocket을 획득하고 획득한 BluetoothSocket을 별도의 쓰레드로 보내고 클라이언트 코드에서 하는 것과 같은 connect() 메서드를 호출하지 않는다.


manageConnectedSocket() 은 앱에서 데이터를 송수신하기 위한 쓰레드를 초기화하는 메서드이다. 이 함수는 뒤의 연결 관리에서 설명하도록 하겠다.

일반적으로 예제에서와 같이 연결을 받자 마자 BluetoothServerSocket을 종료한다. 이것은 close() 메서드를 호출하면 되고 또한 별도의 서버 소켓을 종료할 수 있는 별도의 public 메서드를 정의하여 다른 쓰레드에서 호출하여 종료시킬 수도 있다.


클라이언트로 연결


원격 장비에 연결하기 위해 먼저 원격 장비에 대한 BluetoothDevice 객체를 얻어야 한다. (BluetoothDevice 객체를 찾는 방법은 위의 장비 찾기 섹션을 참조하기 바란다.)

BluetoothDevice를 통해 BluetoothSocket을 얻고 연결을 시도한다.


다음은 이에 대한 기본 흐름이다.


1. BluetoothDevice의 createRfcommSocketToServiceRecord(UUID) 메서드를 통해 BluetoothSocket을 얻는다.


이 메서드는 BluetoothDevice에 연결할 수 있도록 BluetoothSocket을 초기화하며 여기에 파라메터로 보내는 UUID는 서버에서 BluetoothServerSocket을 오픈할 때 사용한 UUID와 일치해야 한다 (listenUsingRfcommWithServiceRecord(String, UUID)). 같은 UUID 문자열을을 하드코딩하고 서버 코드와 클라이언트 코드에서 공유하여 사용하는 것이 좋다.


2. connect() 메서드를 호출하여 연결을 시도한다.


이 메서드 호출은 시스템이 UUID를 매치시키기 위하여 원격 장비의 SDP를 조회한다. 만약 성공적으로 조회되면 원격 장비는 연결을 수락하고 연결되어 있는 동안 사용할 수 있는 RFCOMM 채널을 공유하고 메서드를 마친다. 만약 연결 실패 혹은 타임아웃(대략 12초)이 되면 예외사항이 발생한다.

connect() 메서드는 블럭킹 호출이므로 항상 메인 액티비티 쓰레드와 별도의 쓰레드로 동작해야 한다.


다음은 블루투스 연결을 시도하는 쓰레드의 기본 코드이다.


private class ConnectThread extends Thread {
    private final BluetoothSocket mmSocket;
    private final BluetoothDevice mmDevice;

    public ConnectThread(BluetoothDevice device) {
        // Use a temporary object that is later assigned to mmSocket,
        // because mmSocket is final
        BluetoothSocket tmp = null;
        mmDevice = device;

        // Get a BluetoothSocket to connect with the given BluetoothDevice
        try {
            // MY_UUID is the app's UUID string, also used by the server code
            tmp = device.createRfcommSocketToServiceRecord(MY_UUID);
        } catch (IOException e) { }
        mmSocket = tmp;
    }

    public void run() {
        // Cancel discovery because it will slow down the connection
        mBluetoothAdapter.cancelDiscovery();

        try {
            // Connect the device through the socket. This will block
            // until it succeeds or throws an exception
            mmSocket.connect();
        } catch (IOException connectException) {
            // Unable to connect; close the socket and get out
            try {
                mmSocket.close();
            } catch (IOException closeException) { }
            return;
        }

        // Do work to manage the connection (in a separate thread)
        manageConnectedSocket(mmSocket);
    }

    /** Will cancel an in-progress connection, and close the socket */
    public void cancel() {
        try {
            mmSocket.close();
        } catch (IOException e) { }
    }
}


연결을 시도하기에 앞서 먼저 cancelDiscovery()를 호출한 것을 주의깊게 살펴보기 바란다. 당신은 장비 검색이 진행이 되고 있던 아니던지 안전하게 처리하려면 항상 이 메서드를 호출해야 한다. (만약 체크를 먼저 하고 싶으면 isCovering() 메서드를 호출)


manageConnectedSocket()은 데이터를 송수신하는 쓰레드를 초기화하는 앱 안에서의 메서드이다. 이것은 다음 섹션에서 설명하도록 하겠다.

BluetoothSocket을 다 사용하면 항상 close() 메서드를 호출하여 자원을 시스템에 되돌려 줘야 한다.


연결 관리


성공적으로 2개의 장비가 연결되면 양쪽 다 BluetoothSocket을 갖게 된다. 이것을 통해 장비 간에 데이터를 공유하면서 재미있는 기능을 만들어 나갈 수 있다.

데이터를 주고 받는 것은 의외로 간단하다.


1. 소켓을 통해 송수신을 핸들링 할 수 있는 InputStream과 OutputStream을 getInputStream()과 getOutputStream()을 통해 얻는다.


2. 이 스트림들의 read(byte[])와 write(byte[]) 메서드를 통해 데이터를 읽고 쓴다.


이것이 데이터 송수신의 모든 것이다. 물론 구현은 좀더 상세하게 고려해야 할 것이다.


먼저 모든 스트림을 읽고 쓰는 작업은 별도의 쓰레드를 선언하여 구현한다. 왜냐 하면 read(byte[])와 write(byte[]) 메서드 둘다 블럭킹 호출이기 때문이다.


read(byte[]) 메서드는 스트림으로 부터 읽기를 마칠 때까지 블럭킹된다. write(byte[]) 메서드는 보통 블럭킹되지 않지만 만약 원격 장비에서 충분히 빠르게 read(byte[]) 메서드를 호출하지 않고 버퍼가 꽉 찰 경우 흐름에 따라 블러킹될 수 있다. 그래서 쓰레드의 메인 루프에서는 InputStream에서 데이터를 읽는 작업을 하고 쓰레드의 별도 public 메서드를 선언하여 OutputStream에 데이터를 쓰는 작업을 처리하도록 구현한다.


다음은 위에서 설명한 프로세스에 대한 간단한 예시이다.


/p>

private class ConnectedThread extends Thread {
    private final BluetoothSocket mmSocket;
    private final InputStream mmInStream;
    private final OutputStream mmOutStream;

    public ConnectedThread(BluetoothSocket socket) {
        mmSocket = socket;
        InputStream tmpIn = null;
        OutputStream tmpOut = null;

        // Get the input and output streams, using temp objects because
        // member streams are final
        try {
            tmpIn = socket.getInputStream();
            tmpOut = socket.getOutputStream();
        } catch (IOException e) { }

        mmInStream = tmpIn;
        mmOutStream = tmpOut;
    }

    public void run() {
        byte[] buffer = new byte[1024];  // buffer store for the stream
        int bytes; // bytes returned from read()

        // Keep listening to the InputStream until an exception occurs
        while (true) {
            try {
                // Read from the InputStream
                bytes = mmInStream.read(buffer);
                // Send the obtained bytes to the UI Activity
                mHandler.obtainMessage(MESSAGE_READ, bytes, -1, buffer)
                        .sendToTarget();
            } catch (IOException e) {
                break;
            }
        }
    }

    /* Call this from the main Activity to send data to the remote device */
    public void write(byte[] bytes) {
        try {
            mmOutStream.write(bytes);
        } catch (IOException e) { }
    }

    /* Call this from the main Activity to shutdown the connection */
    public void cancel() {
        try {
            mmSocket.close();
        } catch (IOException e) { }
    }
}


생성자에서 한번만 필요한 스트림을 얻고 쓰레드 동작(run())에서 InputStream을 통해 데이터가 도착할 때까지 대기한다.


스트림으로 부터 byte[] 데이터가 도착하면 read(byte[]) 메서드는 즉시 반환하고 부모 클래스의 멤버 변수로 있는 Handler를 통해 메인 액티비티에 데이터를 전달한다.

그 다음 다시 스트림으로 부터 다른 byte[] 데이터가 도착할 때 대기한다.


데이터를 보내는 것은 메인 액티비티에서 보낼 byte[] 데이터를 파라메터로 하여 쓰레드의 write() 메서드를 호출하도록 구현되어져 있다. 이 메서드는 원격 장비에 데이터를 전송하기 위해 write(byte[]) 메서드를 호출한다.


쓰레드의 cancel() 메서드는 언제든지 BluetoothSocket을 종료해야 하므로 아주 중요한 메서드이다. 이 메서드는 모든 블루투스 연결을 통해 진행되는 작업이 마쳐지면 호출되어져야 한다.


Profile를 사용하여 작업하기


안드로이드 3.0을 시작으로 블루투스 API는 블루투스 Profile을 사용하여 작업할 수 있는 지원사항이 포함되어졌다.


블루투스 Profile은 장비간 블루투스 기반 통신에 대해 무선 인터페이스 규약(표준)서이다. 예를 들어 모바일 폰과 무선 헤드셋을 연결하는 Hands-Free profile 이 있다. 양쪽의 장비가 Hands-Free profile을 지원한다면 손쉽게 연결될 것이다.


당신은 특정한 블루투스 profile을 지원하기 위해 BluetoothProfile 인터페이스에 대해 클래스들을 구현할 수 있다.

안드로이드 블루투스 API는 다음과 같은 블루투스 profile들에 대해 구현물을 제공하고 있다.


  • Headset - Headset profile은 블루투스 헤드셋을 모바일 폰에서 사용할 수 있도록 지원한다. 안드로이드는 BluetoothHeadset 클래스를 제공하며 IPC(Interprocess communication)을 통해 블루투스 Headset 서비스를 제어하는 프록시 클래스 이다. 이것은 블루투스 Headset과 Hands-Free (v1.5) profile을 포함하고 있다. BluetoothHeadset 클래스는 AT 명령어들에 대한 지원 사항이 포함되어져 있다. 좀더 자세한 사항은 Vendor-specific AT commands을 보기 바란다.
  • A2DP (Advanced Audio Distribution Profile) - A2DP는 고품질 오디오가 블루투스 연결을 통해 장비간 전달될 수 있는 방법을 정의하고 있다. 안드로이드는 IPC를 통해 블루투스 A2DP 서비스를 제어할 수 있는 BluetoothA2dp 프록시 클래스를 제공하고 있다.


Profile을 사용하여 작업하는 기본 프로세스는 다음과 같다.


  1. 블루투스 설정 섹션에서 설명한 방법으로 기본 어댑터를 얻는다.
  2. getProfileProxy() 메서드를 사용하여 profile과 연관된 프록시 객체와 연결하도록 시도한다. 아래 예제의 프록시 객체는 BluetoothHeadset 인스턴스이다.
  3. BluetoothProfile.ServiceListener를 설정한다. 이 리스너는 서버스로 부터 연결되거나 연결 해제될 때 BluetoothProfile IPC 클라이언트들에게 알려주는 역할을 수행한다.
  4. onServiceConnected() 메서드에 profile 프록시 객체를 얻는다.
  5. 일단 profile 프록시 객체를 가지면 연결 상태를 모니터할 수 있고 profile과 연관된 다른 작업을 수행할 수 있다.


다음은 headset profile을 제어할 수 있는 BluetoothHeadset 프록시 객체를 얻는 방법에 대한 예시이다.


BluetoothHeadset mBluetoothHeadset;

// Get the default adapter
BluetoothAdapter mBluetoothAdapter = BluetoothAdapter.getDefaultAdapter();

// Establish connection to the proxy.
mBluetoothAdapter.getProfileProxy(context, mProfileListener, BluetoothProfile.HEADSET);

private BluetoothProfile.ServiceListener mProfileListener = new BluetoothProfile.ServiceListener() {
    public void onServiceConnected(int profile, BluetoothProfile proxy) {
        if (profile == BluetoothProfile.HEADSET) {
            mBluetoothHeadset = (BluetoothHeadset) proxy;
        }
    }
    public void onServiceDisconnected(int profile) {
        if (profile == BluetoothProfile.HEADSET) {
            mBluetoothHeadset = null;
        }
    }
};

// ... call functions on mBluetoothHeadset

// Close proxy connection after use.
mBluetoothAdapter.closeProfileProxy(mBluetoothHeadset);


Vecdor-specific AT commands


안드로이드 3.0 부터 headset들에 의해 전송되는 미리 정의된 vendor-specific AT 명령어들(Plantronics +XEVENT 명령어 등)의 시스템 브로드캐스트를 받을 수 있도록 등록할 수 있다.


예를 들어 앱은 연결된 장비의 배터리 량을 가리키는 브로드캐스트들을 수신받을 수 있고 사용자에 대해 전달받을 수 있으며 필요한 다른 액션을 획득할 수 있다.


headset에 대한 vendor-specific AT 명령어들을 핸들링하기 위해서는 ACTION_VENDOR_SPECIFIC_HEADSET_EVENT 인텐트에 대한 브로드캐스트 리시버를 생성하여 등록하면 된다.


Posted by k1rha
2012. 9. 16. 16:05

[출처 :http://blog.naver.com/inganyoyo?Redirect=Log&logNo=90072811148


receive.java

#####################################################################

import java.io.File;

import java.io.FileOutputStream;

import java.io.IOException;

import java.io.InputStream;

import java.net.Socket;

import java.net.UnknownHostException;


public class receiver extends Thread {

Socket socket = null

File file = null

FileOutputStream fos = null

InputStream is = null


public receiver() throws UnknownHostException, IOException {

socket = new Socket("127.0.0.1", 8000);

file = new File("./receiver.avi");

fos = new FileOutputStream(file);

is = socket.getInputStream();

}


public static void main(String[] args) throws UnknownHostException,

IOException {

receiver r = new receiver();


int readCount = 0;

byte[] buffer = new byte[4096];

r.start();

while ((readCount = r.is.read(buffer)) > 0) {

r.fos.write(buffer, 0, readCount);

}

System.out.println(");

r.is.close();

r.fos.close();

r.stop()

}


public void run() {

File file = new File("./receiver.avi");

long curr = 0;

long before = 0;

while (true) {

if (file.exists()) {

try {

Thread.sleep(1000);

curr = file.length();

System.out

.println((double) ((((curr - before) / 1024)) / 1024));

before = curr;


catch (InterruptedException e) {

e.printStackTrace();

}

}

}

}

}

 ###################################################################


sender.java

#####################################################################

import java.io.File;

import java.io.FileInputStream;

import java.io.IOException;

import java.io.OutputStream

import java.net.ServerSocket;

import java.net.Socket;


public class sender {

public static void main(String[] args) throws IOException {

ServerSocket ss = new ServerSocket(8000);

Socket socket = ss.accept();

OutputStream os = socket.getOutputStream();


File file = new File("./sender.avi");

FileInputStream fis = new FileInputStream(file);

int readCount = 0;

byte[] buffer = new byte[4096];


while((readCount = fis.read(buffer))>0){

os.write(buffer, 0, readCount);

}


System.out.println(");

os.close();

fis.close();


}

}


#####################################################################

[출처] 자바 파일전송|작성자 우왕귿


Posted by k1rha
2012. 9. 14. 11:56

Androidのカメラを使用したかったのでサンプルプログラムを書いてみた.

ついでに,取得した画像をPCにソケットで転送しPCのディスプレイ上で表示した.


以下,プログラム.
カメラ画像の取得については,↓のサイトを参考にした.
Androidメモ

画像の解像度は,デフォルトサイズでは,2048×1536(1M~1.2M)となり,転送に時間がかかったので,480×320に変更した.

[Android側-CameraTest.java]

  1. package com.blogspot.ayakix_lablog.camera;  
  2. import android.app.Activity;  
  3. import android.os.Bundle;  
  4. import android.view.Window;  
  5. import android.view.WindowManager;  
  6.   
  7. public class CameraTest extends Activity {  
  8.  /** Called when the activity is first created. */  
  9.  @Override  
  10.  public void onCreate(Bundle savedInstanceState) {  
  11.   super.onCreate(savedInstanceState);  
  12.   requestWindowFeature(Window.FEATURE_NO_TITLE);  
  13.   setContentView(new CameraView(this));  
  14.   getWindow().addFlags(WindowManager.LayoutParams.FLAG_FULLSCREEN);  
  15.  }  
  16. }  


[Android側-CameraView.java]
  1. package com.blogspot.ayakix_lablog.camera;  
  2. import android.content.Context;  
  3. import android.graphics.PixelFormat;  
  4. import android.hardware.Camera;  
  5. import android.view.MotionEvent;  
  6. import android.view.SurfaceHolder;  
  7. import android.view.SurfaceView;  
  8. import java.io.BufferedOutputStream;  
  9. import java.net.Socket;  
  10.   
  11. public class CameraView extends SurfaceView implements SurfaceHolder.Callback {  
  12.  private SurfaceHolder holder; //ホルダー  
  13.  private Camera camera; //カメラ  
  14.  private static final int WIDTH  = 480;  
  15.  private static final int HEIGHT = 320;  
  16.  private static final int PORT = 4680;  
  17.  private static final String IP_ADDR = "1.1.1.1"// IPアドレス  
  18.   
  19.  public CameraView(Context context) {  
  20.   super(context);  
  21.   // サーフェイスホルダーの生成  
  22.   holder=getHolder();  
  23.   holder.addCallback(this);  
  24.   //プッシュバッッファの指定  
  25.   holder.setType(SurfaceHolder.SURFACE_TYPE_PUSH_BUFFERS);  
  26.  }  
  27.   
  28.  public void surfaceCreated(SurfaceHolder holder) {  
  29.   // カメラの初期化  
  30.   try {  
  31.    camera=Camera.open();  
  32.    camera.setPreviewDisplay(holder);  
  33.   } catch (Exception e) {  
  34.   }  
  35.  }  
  36.   
  37.  public void surfaceChanged(SurfaceHolder holder,int format,int w,int h) {  
  38.   // カメラのプレビュー開始  
  39.   Camera.Parameters parameters=camera.getParameters();  
  40.   parameters.setPictureSize(WIDTH, HEIGHT);  
  41.   parameters.setPreviewFormat(PixelFormat.JPEG);  
  42.   camera.setParameters(parameters);  
  43.   camera.startPreview();  
  44.  }  
  45.   
  46.  public void surfaceDestroyed(SurfaceHolder holder) {  
  47.   // カメラのプレビュー停止  
  48.   camera.setPreviewCallback(null);  
  49.   camera.stopPreview();  
  50.   camera.release();  
  51.   camera=null;  
  52.  }  
  53.   
  54.  @Override  
  55.  public boolean onTouchEvent(MotionEvent event) {  
  56.   if (event.getAction()==MotionEvent.ACTION_DOWN) {  
  57.    takePicture();  
  58.    camera.startPreview();  
  59.   }  
  60.   return true;  
  61.  }  
  62.   
  63.  public void takePicture() {  
  64.   // カメラのスクリーンショットの取得  
  65.   camera.takePicture(nullnull,new Camera.PictureCallback() {  
  66.    public void onPictureTaken(byte[] data,Camera camera) {  
  67.     sendData(getContext(), data);  
  68.    }  
  69.   });  
  70.  }  
  71.   
  72.  private void sendData(Context context, byte[] data){  
  73.   // ソケットの作成  
  74.   Socket socket;  
  75.   BufferedOutputStream out;  
  76.   try{  
  77.    socket = new Socket(IP_ADDR, PORT);  
  78.    out = new BufferedOutputStream(socket.getOutputStream());  
  79.    out.write(data);  
  80.    if(out != null) out.close();  
  81.    if(socket != null) socket.close();  
  82.   } catch (Exception ex){  
  83.    ex.printStackTrace();  
  84.   }  
  85.  }  
  86. }  


[Android側-AndroidManifest.xml]
  1. <manifest versioncode="1" versionname="1.0" package="com.blogspot.ayakix_lablog.camera" android="http://schemas.android.com/apk/res/android">  
  2. <application icon="@drawable/icon" label="@string/app_name">  
  3.  <activity label="@string/app_name" name=".CameraTest" android:screenorientation="landscape">  
  4.   <intent-filter>  
  5.                  <action name="android.intent.action.MAIN">  
  6.                   <category name="android.intent.category.LAUNCHER"></category>  
  7.           </action>  
  8.       </intent-filter>  
  9.       <uses-permission name="android.permission.CAMERA"></uses-permission>  
  10.       <uses-permission name="android.permission.INTERNET"></uses-permission>  
  11.  </activity>  
  12. </application>  
  13. </manifest>  


[PC側-Main.java]
  1. import java.io.*;  
  2. import java.net.*;  
  3.   
  4. public class Main {  
  5.  private static final int PORT = 4680;  
  6.   
  7.  public static void main(String argv[]) {  
  8.   System.out.println("サーバ起動");  
  9.   int num = 0;  
  10.   ServerSocket serverSocket = null;  
  11.   while(true){  
  12.    try {  
  13.     // サーバーソケットの生成  
  14.     if(serverSocket == null) serverSocket = new ServerSocket(PORT);  
  15.     // クライアントからの接続を待ちます  
  16.     Socket socket = serverSocket.accept();  
  17.     BufferedOutputStream out = new BufferedOutputStream(  
  18.        new FileOutputStream(new File(num + ".jpg")));  
  19.     // 入力ストリームを取得  
  20.     BufferedInputStream in = new BufferedInputStream(socket.getInputStream());  
  21.     byte[] buf = new byte[1024];  
  22.     int len;  
  23.     while((len=in.read(buf))!=-1){  
  24.      out.write(buf, 0, len);  
  25.     }  
  26.     // GUIで画像を表示  
  27.     new GUIExe(num);  
  28.     // 入出力ストリームを閉じる  
  29.     out.flush();  
  30.     out.close();  
  31.     in.close();  
  32.     System.out.println("done");  
  33.     // ソケットを閉じる  
  34.     socket.close();  
  35.     num++;  
  36.    } catch(Exception e) {  
  37.     e.printStackTrace();  
  38.    }  
  39.   }  
  40.  }  
  41. }  
  42.   
  43. class GUIExe extends Thread {  
  44.  private int num;  
  45.    
  46.  public GUIExe(int num) {  
  47.   this.num = num;  
  48.   this.start();  
  49.   // スレッド開始  
  50.  }  
  51.  public void run() {  
  52.   new GUI(num);  
  53.  }  
  54. }  


[PC側-GUI.java]
  1. import java.awt.Graphics;  
  2. import java.awt.Graphics2D;  
  3. import java.awt.event.WindowAdapter;  
  4. import java.awt.event.WindowEvent;  
  5. import java.awt.image.BufferedImage;  
  6. import java.io.File;  
  7. import javax.imageio.ImageIO;  
  8. import javax.swing.JFrame;  
  9.   
  10. public class GUI extends JFrame {  
  11.  private int num;  
  12.  private final int WIDTH  = 480;  
  13.  private final int HEIGHT = 320;  
  14.    
  15.  public GUI(int num){  
  16.   this.num = num;  
  17.   this.addWindowListener(new WindowAdapter(){  
  18.    public void windowClosing(WindowEvent e){  
  19.     System.exit(0);  
  20.    }  
  21.   });  
  22.   
  23.   this.setBounds(00, WIDTH, HEIGHT);  
  24.   this.setLocation(num/3*WIDTH, num%3*HEIGHT);  
  25.   this.setUndecorated(true);  
  26.   this.setVisible(true);  
  27.  }  
  28.   
  29.  public void paint(Graphics g){  
  30.   Graphics2D g2 = (Graphics2D)g;  
  31.   BufferedImage readImage = null;  
  32.   try {  
  33.    readImage = ImageIO.read(new File(num + ".jpg"));  
  34.   } catch (Exception e) {  
  35.    e.printStackTrace();  
  36.    readImage = null;  
  37.   }  
  38.   if (readImage != null){  
  39.    g2.drawImage(readImage, 00, WIDTH, HEIGHT, this);  
  40.   }  
  41.  }  
  42. }  

Posted by k1rha
2012. 9. 10. 00:19

nowDisplay = ((WindowManager) getSystemService(WINDOW_SERVICE))

.getDefaultDisplay();


// 변수에 해상도 저장하기.

int width = nowDisplay.getWidth();

int height = nowDisplay.getHeight();


Posted by k1rha
2012. 9. 9. 21:23

LayoutInflater controlInflater = LayoutInflater.from(getBaseContext());

View viewControl = controlInflater.inflate(R.layout.make_room, null);

LayoutParams layoutParamsControl = new LayoutParams(LayoutParams.FILL_PARENT, LayoutParams.FILL_PARENT);

this.addContentView(viewControl, layoutParamsControl);

Posted by k1rha
2012. 9. 9. 17:59

가끔 헤깔릴때가 있는데 센서값은 manifast 에 등록시켜주지 않아도 잘 작동한다. 


public class MainActivity extends Activity {

SensorManager mSm;

CompassView mView;

public void onCreate(Bundle savedInstanceState) {

super.onCreate(savedInstanceState);

mView = new CompassView();


mSm = (SensorManager)getSystemService(Context.SENSOR_SERVICE);

}


protected void onResume() {

super.onResume();

mSm.registerListener(mView, mSm.getDefaultSensor(Sensor.TYPE_ORIENTATION), 

SensorManager.SENSOR_DELAY_UI);

}


protected void onPause() {

super.onPause();

mSm.unregisterListener(mView);

}


class CompassView implements SensorEventListener {

float azimuth;

float pitch;

float roll;

final static int MAX = 30;

Paint textPnt = new Paint();

Bitmap compass;

int width;

int height;

int w10;

int h10;

int thick;

int length;


public void onAccuracyChanged(Sensor sensor, int accuracy) {

}


public void onSensorChanged(SensorEvent event) {

float[] v = event.values;

switch (event.sensor.getType()) {

case Sensor.TYPE_ORIENTATION:

if (azimuth != v[0] || pitch != v[1] || roll != v[2]) {

azimuth = v[0];

pitch = v[1];

roll = v[2];

Log.e("Test Acitivitiy","--------------------"+pitch);

}

break;

}

}

}

}

Posted by k1rha
2012. 8. 20. 17:30

Thread - Handler 방식은 UI 쓰레드와 스케쥴링같은 효과가 안된다.

때문에 asyncTask 로 구현을 해보기로 결정! 잘되면 이어서 포스팅하겟다. 


[출처 : http://darrysea.tistory.com/25 ]


메니페스트 파일 입니다.
1 <?xml version="1.0" encoding="utf-8"?> 2 <manifest xmlns:android="http://schemas.android.com/apk/res/android" 3 package="com.asynctask" 4 android:versionCode="1" 5 android:versionName="1.0" > 6 7 <uses-sdk android:minSdkVersion="8" /> 8 9 <application 10 android:icon="@drawable/ic_launcher" 11 android:label="@string/app_name" > 12 <activity 13 android:configChanges="orientation" 14 android:label="@string/app_name" 15 android:name=".TestAsyncTaskActivity" > 16 <intent-filter > 17 <action android:name="android.intent.action.MAIN" /> 18 19 <category android:name="android.intent.category.LAUNCHER" /> 20 </intent-filter> 21 </activity> 22 </application> 23 24 </manifest>

가운데 굵게 표시된 부분을 추가해야 한다.
이유는 저렇게 하지 않으면 화면이 회전될때 액티비티가 새로 onCreate를 수행하기 때문에 정상적인 동작이 되지 않는다.
저렇게 해주면 화면모드 전환을 액티비티에서 알아서 하겟다는 의미이다.


main.xml
1 <?xml version="1.0" encoding="utf-8"?> 2 <LinearLayout xmlns:android="http://schemas.android.com/apk/res/android" 3 android:layout_width="fill_parent" 4 android:layout_height="fill_parent" 5 android:orientation="vertical" > 6 7 <Button 8 android:id="@+id/button1" 9 android:layout_width="match_parent" 10 android:layout_height="wrap_content" 11 android:text="Button" /> 12 13 <ProgressBar 14 android:id="@+id/progressBar1" 15 style="?android:attr/progressBarStyleHorizontal" 16 android:layout_width="match_parent" 17 android:layout_height="wrap_content" 18 android:layout_marginTop="100dp" /> 19 20 </LinearLayout>
 

TestAsyncTaskActivity.java
  1 package com.asynctask;

2 3 import android.app.*; 4 import android.os.*; 5 import android.view.*; 6 import android.view.View.OnClickListener; 7 import android.widget.*; 8 9 public class TestAsyncTaskActivity extends Activity { 10 11 Button btn; 12 ProgressBar pb; 13 14 /** Called when the activity is first created. */ 15 @Override 16 public void onCreate(Bundle savedInstanceState) { 17 super.onCreate(savedInstanceState); 18 setContentView(R.layout.main); 19 20 btn = (Button) findViewById(R.id.button1); 21 pb = (ProgressBar) findViewById(R.id.progressBar1); 22 23 btnEvent(); 24 } 25 26 private void btnEvent() { 27 btn.setOnClickListener(new OnClickListener() { 28 29 @Override 30 public void onClick(View v) { 31 new ExampleAsyncTask().execute("1", "2", "3", "4", "5"); 32 } 33 }); 34 } 35 36 class ExampleAsyncTask extends AsyncTask<String, Integer, Long> { 37 38 @Override 39 protected void onCancelled() { 40 super.onCancelled(); 41 } 42 43 @Override 44 protected void onPostExecute(Long result) { 45 btn.setText("Thread END"); 46 super.onPostExecute(result); 47 } 48 49 @Override 50 protected void onPreExecute() { 51 btn.setText("Thread START!!!!"); 52 super.onPreExecute(); 53 } 54 55 @Override 56 protected void onProgressUpdate(Integer... values) { 57 pb.setProgress(values[0]); 58 super.onProgressUpdate(values); 59 } 60 61 @Override 62 protected Long doInBackground(String... params) { 63 long result = 0; 64 int numberOfParams = params.length; 65 66 for (int i = 0; i < numberOfParams; i++) { 67 SystemClock.sleep(1000); 68 69 publishProgress((int) (((i + 1) / (float) numberOfParams) * 100)); 70 } 71 return result; 72 } 73 } 74 }

다 해준다.
하나하나 살펴보자.
메소드 이름도 직관적이라 참 알아보기 쉽다..

39번줄 취소할때 호출되는 Callback이다.
44번줄 작업이 끝난 후 호출 되는
Callback이다.
50번줄 작업이 시작하기 전에 호출 되는 
Callback이다.
56번줄 UI Update이다.
62번줄 내부에서 하는 작업이다.


Thread / Handler와의 관계를 보자면,
Thread == 62번줄
Handler == 56번줄 + 44번줄
removeCallback == 39번줄


이라고 생각하면 될 듯 하다.


아 참고로
AsyncTask를 사용 할 때는 항상 SubClass로 구현하라는데, 이유는 찾아봐야 할것 같다. 

Posted by k1rha
2012. 8. 3. 22:56

[출처 :http://blog.naver.com/khs7515?Redirect=Log&logNo=20155866934 ] 


Service란 액티비티와는 반대로 눈에 보이지 않는 작업 단위를 처리하는 객체이다.

   Thread와 다른점은 Thread는 Activity와 생명주기를 함께 하지만 Service는 스스로의 생명주기를 가지고 있기 때문에

   따로 종료해주지 않는 이상 앱을 종료해도 살아있다.


# 본 예제는 시작 버튼을 누르면 서비스를 상속받은 페이지로 이동해서 Thread를 실행시키고 Thread가 10초 단위로 5개의 메세지를 

   순서대로 handler에 보낸다. handler는 받은 메세지를 Notification(알림)을 통해서 출력한다.


*************************************** MainActivity.java ******************************************


package test.day10.service;


/*

 * [ 안드로이드 4대요소 ]

 *  

 * 1. Activity - 실체 사용자를 대면하고 입력을 받는 것

 * 2. Service - 레이아웃이 없는데 뭔가 작업한다. 감시를 한다던가..(manifest등록해야한다)

 * 3. Alarm 

 * 4. ContentProvider - 콘텐츠 공급 객체(다른 어플의 자원, 사진, 동영상, 음악을 읽어올때)

 * 

 */

import android.app.Activity;

import android.content.Intent;

import android.os.Bundle;

import android.view.View;


public class MainActivity extends Activity {

    /** Called when the activity is first created. */

    @Override

    public void onCreate(Bundle savedInstanceState) {

        super.onCreate(savedInstanceState);

        setContentView(R.layout.main);

    }

    //서비스 시작 시키기

    public void start(View v){

     //인텐트 객체 생성

     Intent intent = new Intent(this, MyService.class);

     //서비스 시작시키기

     startService(intent);


    }

    //서비스 종료 시키기

    public void end(View v){

     //인텐트 객체 생성

     Intent intent = new Intent(this, MyService.class);

     //서비스 종료시키기

     stopService(intent);

    }

}


*************************************** MyService.java ******************************************


package test.day10.service;


import android.app.Notification;

import android.app.NotificationManager;

import android.app.PendingIntent;

import android.app.Service;

import android.content.Context;

import android.content.Intent;

import android.os.Handler;

import android.os.IBinder;

import android.os.Message;

import android.widget.Toast;

//manifest에 등록해야함.

public class MyService extends Service{


//알림을 띄울 것이므로 

NotificationManager notiManager;

//thread

ServiceThread thread;

//알림을 중복을 피하기 위한 상태값

final int MyNoti = 0;

@Override

public IBinder onBind(Intent intent) {

//할일 없음

return null;

}

//서비스가 시작되면 onstartcommand가 호출된다. 

@Override

public int onStartCommand(Intent intent, int flags, int startId) {

/*

 * 서비스에서 수행할 작업을 수행시키고 재빨리 리턴한다.

 * 시간이 오래 걸리면 서비스가 취소된다.

 * 액티비티는 생명주기가 있지만 서비스는 생명주기가 없다(메모리가 부족하지 않다면 계속 백그라운드에 떠있다.)

 * ex. 카카오톡의 경우 새로운 메시지가 오는지 지속적으로 관찰하는 작업

 */

notiManager = (NotificationManager)getSystemService(Context.NOTIFICATION_SERVICE);

//백그라운드에서 작업할 내용을 초기화 하고 시작한다.

thread = new ServiceThread(handler);

//스레드 시작하기

thread.start();

return START_STICKY;

}

//서비스가 종료될 때 할 작업

public void onDestroy() {

//스레드 종료시키기

thread.stopForever();

thread=null;//쓰레기 값을 만들어서 빠르게 회수하라고 null을 넣어줌.

}

//백그라운드 스레드로부터 메세지를 받을 핸들러 객체 

Handler handler = new Handler(){

public void handleMessage(android.os.Message msg) {

//what으로 메시지를 보고 obj로 메시지를 받는다.(형변환필수)

//notification 객체 생성(상단바에 보여질 아이콘, 메세지, 도착시간 정의)

     Notification noti = new Notification(R.drawable.icon//알림창에 띄울 아이콘

     , "메시지 도착!", //간단 메세지

     System.currentTimeMillis()); //도착 시간

     //기본으로 지정된 소리를 내기 위해

     noti.defaults = Notification.DEFAULT_SOUND;

     //알림 소리를 한번만 내도록

     noti.flags = Notification.FLAG_ONLY_ALERT_ONCE;

     //확인하면 자동으로 알림이 제거 되도록

     noti.flags = Notification.FLAG_AUTO_CANCEL;

     //사용자가 알람을 확인하고 클릭했을때 새로운 액티비티를 시작할 인텐트 객체

     Intent intent = new Intent(MyService.this, MainActivity.class);

     //새로운 태스크(Task) 상에서 실행되도록(보통은 태스크1에 쌓이지만 태스크2를 만들어서 전혀 다른 실행으로 관리한다)

     intent.addFlags(Intent.FLAG_ACTIVITY_NEW_TASK);

     //인텐트 객체를 포장해서 전달할 인텐트 전달자 객체

     PendingIntent pendingI = PendingIntent.getActivity(MyService.this, 0, intent, 0);

     //받아온 메시지 담기

     String arrivedMsg = (String)msg.obj;

     //상단바를 드래그 했을때 보여질 내용 정의하기

     noti.setLatestEventInfo(MyService.this, "[새 메세지]", arrivedMsg, pendingI);

     //알림창 띄우기(알림이 여러개일수도 있으니 알림을 구별할 상수값, 여러개라면 상수값을 달리 줘야 한다.)

     notiManager.notify(MyNoti, noti);

     //토스트 띄우기

     Toast.makeText(MyService.this, arrivedMsg, 0).show();


}

};


}


*************************************** ServiceThread.java ******************************************


package test.day10.service;


import android.os.Handler;

import android.os.Message;

/*

 * 서비스에서 사용할 스레드 클래스

 */

public class ServiceThread extends Thread{

//서비스 객체의 핸들러

Handler handler;

boolean isRun = true;

//예제로 서비스할 메세지

String msg[] = {"나는 서비스 입니다.", "액티비티와 상관없이 살아있습니다.", "메세지1", "메세지2", "메세지3"};

//생성자

public ServiceThread(Handler handler){

this.handler = handler;

}

//스레드 정지 시키는 메소드

public void stopForever(){

synchronized (this) {

this.isRun = false;

notify();

}

}

int index;

//스레드 본체

public void run(){

//반복적으로 수행할 작업을 한다.

while(isRun){

//핸들러로 들어오는 메시지별로 다르게 동작.

String message = msg[index];

index++;

//핸들러에 전달할 Message 객체 생성하기

Message m = new Message();

if(index==4) index = 0;

if(index==3) {

m.what = 1;

m.obj = message;

}else{

m.what = 0;

m.obj = message;

}

//핸들러에 메세지를 보낸다.

handler.sendMessage(m);

try{

Thread.sleep(10000); //10초씩 쉰다.

}catch (Exception e) {}

}

}

}


*************************************** main.xml ******************************************


<?xml version="1.0" encoding="utf-8"?>

<LinearLayout xmlns:android="http://schemas.android.com/apk/res/android"

    android:orientation="vertical"

    android:layout_width="fill_parent"

    android:layout_height="fill_parent"

    >

<TextView  

    android:layout_width="fill_parent" 

    android:layout_height="wrap_content" 

    android:text="서비스 테스트"

    />

    <Button android:layout_width="fill_parent"

    android:layout_height="wrap_content"

    android:text="서비스 시작"

    android:onClick="start"/>

    <Button android:layout_width="fill_parent"

    android:layout_height="wrap_content"

    android:text="서비스 종료"

    android:onClick="end"/>

</LinearLayout>


*************************************** AndroidManifest.xml ******************************************


<?xml version="1.0" encoding="utf-8"?>

<manifest xmlns:android="http://schemas.android.com/apk/res/android"

      package="test.day10.service"

      android:versionCode="1"

      android:versionName="1.0">

    <uses-sdk android:minSdkVersion="8" />


    <application android:icon="@drawable/icon" android:label="@string/app_name">

        <activity android:name=".MainActivity"

                  android:label="@string/app_name">

            <intent-filter>

                <action android:name="android.intent.action.MAIN" />

                <category android:name="android.intent.category.LAUNCHER" />

            </intent-filter>

        </activity>

<service android:name=".MyServiceandroid:enabled="true"/>

    </application>

</manifest>

Posted by k1rha
2012. 8. 3. 22:52

서비스를 띄우고 액티비티가 종료시 다시 띄울때 서비스를 체크해 줘야 한다.


private Boolean isServiceRunning(String serviceName) {

ActivityManager activityManager = (ActivityManager) getSystemService(ACTIVITY_SERVICE);
for (RunningServiceInfo runningServiceInfo : activityManager.getRunningServices(Integer.MAX_VALUE)) {
if (serviceName.equals(runningServiceInfo.service.getClassName())) {
return true;
}
}
return false;


Posted by k1rha
2012. 8. 3. 22:48


 public void MessageCloass() {

// mValue++;
// mText.setText(Integer.toString(mValue));

mNotiManager = (NotificationManager) getSystemService(NOTIFICATION_SERVICE);

Notification noti = new Notification(R.drawable.ic_launcher,
"링크허브 메시지", System.currentTimeMillis());
noti.defaults |= Notification.DEFAULT_SOUND;
// 진동 사용
noti.defaults |= (Notification.DEFAULT_SOUND | Notification.DEFAULT_VIBRATE);
// 커스텀 진동
noti.vibrate = new long[] { 1000, 1000, 500, 500, 200, 200, 200, 200,
200, 200 };
noti.flags |= Notification.FLAG_INSISTENT;

Intent intent = new Intent(linkhub_main.this, linkhub_main.class);
intent.addFlags(Intent.FLAG_ACTIVITY_NEW_TASK);
PendingIntent content = PendingIntent.getActivity(linkhub_main.this, 0,
intent, 0);
noti.setLatestEventInfo(linkhub_main.this, "링크허브 메시지", "메시지가 도착하였습니다.",content);

mNotiManager.notify(linkhub_main.NAPNOTI, noti);


 public void MessageCloass() {

// mValue++;
// mText.setText(Integer.toString(mValue));

mNotiManager = (NotificationManager) getSystemService(NOTIFICATION_SERVICE);

Notification noti = new Notification(R.drawable.ic_launcher,
"링크허브 메시지", System.currentTimeMillis());
noti.defaults |= Notification.DEFAULT_SOUND;
// 진동 사용
noti.defaults |= (Notification.DEFAULT_SOUND | Notification.DEFAULT_VIBRATE);
// 커스텀 진동
noti.vibrate = new long[] { 1000, 1000, 500, 500, 200, 200, 200, 200,
200, 200 };
noti.flags |= Notification.FLAG_INSISTENT;

//Intent intent = new Intent();
//intent.addFlags(Intent.FLAG_ACTIVITY_NEW_TASK);
// PendingIntent contentIntent = PendingIntent.getActivity(linkhub_main.this, 0, new Intent(this,linkhub_main.class),0);

// PendingIntent content = PendingIntent.getActivity(linkhub_main.this, 0, intent,0);
// startService(intent);
//noti.setLatestEventInfo(context, contentTitle, contentText, contentIntent)
noti.setLatestEventInfo(linkhub_main.this, "링크허브 메시지", "메시지가 도착하였습니다.", pendingIntent());
mNotiManager.notify(linkhub_main.NAPNOTI, noti);
}
public PendingIntent pendingIntent() {
Intent i = new Intent(getApplicationContext(), linkhub_main.class);
PendingIntent pi = PendingIntent.getActivity(this, 0, i, 0);
cancelNotivication();
return pi;
}
public void cancelNotivication(){
mNotiManager.cancelAll();
}

Posted by k1rha
2012. 8. 3. 22:41

package tae.NetworkClient;
 
import java.net.DatagramPacket;
import java.net.DatagramSocket;
import java.net.InetAddress;
import android.util.Log;
 
public class NetworkUDP {
    private static final String serverIP = "10.0.2.2"; //serverIP를 추가합니다.
    private static final int port = 8000; //서버에서 설정한 UDP 포트번호를 추가합니다.
    private String msg;
    private String return_msg;
         
    public NetworkUDP(String _msg) {
        this.msg = _msg;
    }
     
    public String run() {
        try {
            DatagramSocket socket = new DatagramSocket();
             
            InetAddress serverAddr = InetAddress.getByName(serverIP);
             
//TCP와 다르게 UDP는 byte단위로 데이터를 전송합니다. 그래서 byte를 생성해줍니다.
            byte[] buf = new byte[128];
             
            //받아온 msg를 바이트 단위로 변경합니다.
            buf = msg.getBytes();
             
            //DatagramPacket를 이용하여 서버에 접속합니다.
            DatagramPacket Packet = new DatagramPacket(buf, buf.length, serverAddr, port);
            Log.d("UDP", "sendpacket.... " + new String(buf));
            socket.send(Packet);
            Log.d("UDP", "send....");
            Log.d("UDP", "Done.");
 
            socket.receive(Packet);
            Log.d("UDP", "Receive" + new String(Packet.getData()));
 
            //데이터를 받아와 return_msg에 복사합니다.
            return_msg = new String(Packet.getData());
 
        } catch (Exception ex) {
            Log.d("UDP", "C: Error", ex);
            }
        return return_msg;
       }
}

Posted by k1rha
2012. 8. 2. 15:35

SO ListView 라이브러리 - 1.0 입니다.

안드로이드 개발 할 때Custom listView 를 간편하게 구현 할 수 있게 랩핑된 라이브러리 입니다.

사용법 문의및 추가 기능이 필요하신 분들은 댓글 남겨주시기 바랍니다.


[출처 : http://iapptocompany.tistory.com/3 ]


SOListViewLibSample.zip


엄청 편하게 잘되어있다. 

Posted by k1rha
2012. 7. 30. 20:39

Thread 에서 소켓 통신을 하고, 그 값을 받아 올때마다  UI를 변경 시켜 주고싶을때, MainActivity를 그대로 넘겨버릴 수도 있지만, 그렇게 되는 경우 Activity의 전환시 그 통신을 계속 할수가 없다. 


Thread 를 다시 생성하여 그 Activity를 넘겨줘야 하기 때문이다. 

이런경우 우리는 singletone pattern 과 Handler를 이용하여 완벽히 해결 할 수 있다. 


우선 Handler 란? 

Thread 에서 UI 같은 Main Thread 의 값을 변경해 주기 위해서 MainThread 의 역할을 잠깐 위임해 주는 것이다.

C#에서는 delegate가 비슷한 역할을 한다. 


사용법은 아래의 출처 예제코드가 가장 간단하고 이해하기 편하다.

http://www.cyworld.com/aspire1127/5581351


사용을 예로들면 

우선 MainActivity 에 Handler 클래스를 선언해 준다.

Override 를 통해 HandlerMessage를 재정의해준다. 


MainAcitivity 의 위 선언부

  public Handler hMain = new Handler() {

@Override

public void handleMessage(Message msg) {

IntentMainToGame(); //MainActivity의 함수이다.

}

};


MainAcitivity->IntentMainToGame()

  public void IntentMainToGame() {

 Toast toast = Toast.makeText(getBaseContext(),"회원가입 완료",Toast.LENGTH_SHORT);

 toast.setGravity(Gravity.CENTER,0, 0);

 toast.show();

Log.e("-------------------------", "thread");

Intent intent = new Intent(MainActivity.this,GameActivity.class);

 startActivity(intent);

}


그리고 MainActivity에서 Thread 를 생성시에 이 핸들러를 넘겨준다.

MainAcitivity 내 thread 호출시..

  mScoketClient.startServer(hMain);


Thread 안에 Thread 시에도 이 핸들러 값만 이어서 가져가 주면된다.

private Handler mHandle=null;
       public void startServer(Handler _handle) {
this.mHandle = _handle;
}


이후에 이 핸들러의 sendMessage를 통하여 인자값을 전하고 원하는 메소드를 호출 시킬수 있다.
Thread 안 메시지 로 sendMessage 호출

 Message msg = Message.obtain(mHandle,0,0);
mHandle.sendMessage(msg);


Posted by k1rha
2012. 7. 26. 15:39

멤버십 과제중 프로토콜 맞추기가 너무 시간이 오래 걸림에 있어 JSON 규약으로 통신을 맞추기로 했다.

게임 개발자의 편의를 맞추기 위해 JSON 방식을 좀더 사용하기 편하게 객체화 시켜 보았다. 


이 포스팅은 오로지 필자가 개인용도로 만든 것이기 때문에, 다른 사용자에게는 오히려 불편할 수 있음을 미리 전한다.

Main Activity


        JsonHandler json = new JsonHandler();

        json.putJsonInit();  //json 초기화 부분.. 값을 입력하기전 반드시 해야한다.


        json.putJson("key1","test1");  //key 값과 value 값을 이어서 필요할때마다 추가해 줄수 있다.

        json.putJson("key2","test2");

        json.putJson("key3","test3");


        String aaa = json.putJsonFinish();   //obj 를 다만들었으면 그것을 array에 추가하는 부분이다. 필요에 따라서 여러개의 오브젝트를 배열로 추가해주는 방식으로 변경할 수 있다.

        Log.e("check"," JSON FINAL STRING "+aaa);  //JSON ARRAY 전체 문자열 출력 


        json.getJsonInit(aaa);   //JSON array 안에 obj 형식으로 들어오는 JSON 만 파싱 가능하다.


        Log.e("result value",":::: resutl : "+json.getJson("key1"));  //getjson 으로 값을 가져 올 수 있다.

        Log.e("result value",":::: resut2 : "+json.getJson("key2"));


JsonHandler.java

 package JsonHandler;


import org.json.JSONArray;

import org.json.JSONException;

import org.json.JSONObject;

import android.util.Log;


public class JsonHandler {

String json_string = null;

String[] jsonGet = new String[20];


String json_ex = "[{\"key01\":\"aaaa\",\"key02\":\"bbbb\"}]";


JSONArray ParseJsonArray = null;

JSONObject ParsejsonRoot = null; // 0번째 라인...다중 배열시엔 for문

JSONArray combineJsonArray = null;

JSONObject combineJsonObject = null;


public JsonHandler() {

ParseJsonArray = null;

ParsejsonRoot = null;

combineJsonArray = null;

combineJsonObject = null;

}

/*JSON 에서 파싱된 값을 가져오기 위한 메소드 */


public void getJsonInit(String _jsonValue) {

try {

ParseJsonArray = new JSONArray(_jsonValue);

ParsejsonRoot = ParseJsonArray.getJSONObject(0);

} catch (JSONException e) {

e.printStackTrace();

}


}


public String getJson(String _key) {

String result=null;

try {

result = ParsejsonRoot.getString(_key);

//소켓 메소드 쪽으로 호출 

} catch (JSONException e) {

// TODO Auto-generated catch block

e.printStackTrace();

}

return result;

}


/*JSON 으로  만들기 관련된 메소드들 */

public void putJsonInit(){

combineJsonObject = new JSONObject();

}

public void putJson(String _key,String _value){

try {

combineJsonObject.put(_key, _value);


} catch (Exception e) {

Log.e("JSON Combine", ":::::array Error " + e.toString());

}

}

public String putJsonFinish(){

combineJsonArray = new JSONArray();


String result = null;

if(combineJsonObject.length()<2){

result = "Object is empty";

}else{

combineJsonArray.put(combineJsonObject);

result = combineJsonArray.toString();

//소켓으로 쏴주기 

}

return result;

}


}


Posted by k1rha
2012. 7. 26. 04:34

멤버십 과제중 안드로이드로 게임통신을 해야하는 부분에서 자바에 WSASelect 가 없으므로 비동기 소켓을 보내고 받는것이 익숙치 않았다. IOCP 소켓이란 것이 이미 윈도우의 이벤트를 이용 하는 것이기 때문에, 자바에서는 100% 맞는 통신은 없지만, 아래와 같이 channel selector 를 이용하여 비슷한 효과로 비동기 소켓을 처리 할 수 있다. 


자바는 WSAselect 가 없기 때문에 IOCP 통신을 해주기위해서 select 개념을 사용해야 한다. 


MainActivity.java


 import android.os.Bundle;

import android.app.Activity;


public class MainActivity extends Activity {


    @Override

    public void onCreate(Bundle savedInstanceState) {

        super.onCreate(savedInstanceState);

        setContentView(R.layout.activity_main);


SimpleChatClient scc = new SimpleChatClient();

scc.initServer();

scc.startServer();

    }

}


SimpleChatClient.java


package com.example.iocpclient;


import java.io.IOException;

import java.net.InetSocketAddress;

import java.nio.ByteBuffer;

import java.nio.channels.SelectionKey;

import java.nio.channels.Selector;

import java.nio.channels.SocketChannel;

import java.nio.charset.CharacterCodingException;

import java.nio.charset.Charset;

import java.nio.charset.CharsetDecoder;

import java.util.Iterator;


import android.util.Log;


public class SimpleChatClient {


private static final String HOST = "210.118.64.148";

private static final int PORT = 5056;


private Selector selector = null;

private SocketChannel sc = null;


private Charset charset = null;

private CharsetDecoder decoder = null;

public SimpleChatClient(){//Handler MainAct) {


charset = Charset.forName("EUC-KR");

decoder = charset.newDecoder();

}


public void initServer() {


try {


// open Selector

selector = Selector.open();

// 소켓채널을 생성한다.

sc = SocketChannel.open(new InetSocketAddress(HOST, PORT));

// 비 블록킹 모드로 설정한다.

sc.configureBlocking(false);

// 서버소켓 채널을 셀렉터에 등록한다.

sc.register(selector, SelectionKey.OP_READ);

} catch (IOException ex) {


Log.e("aaa", "_____________________1" + ex.toString());

System.exit(0);

// log(Level.WARNING, "SimpleChatClient.initServer()", ex);

}

}


public void startServer() {

//startWriter();

Thread tWriter = new WriteThread(sc);

tWriter.start();

/*쓰레드 추가 */

ReaderThread tReader = new ReaderThread();

tReader.start();

}

public class ReaderThread extends Thread {

public ReaderThread(){

}

public void run() {

try {

while (true) {

// info("요청을 기다리는중...");

// 셀렉터의 select() 메소드로 준비된 이벤트가 있는지 확인한다.

selector.select();

// 셀렉터의 SelectoedSet에 저장된 준비된 이벤트들(SelectionKey)을 하나씩 처리한다.

Iterator it = selector.selectedKeys().iterator();

while (it.hasNext()) {

SelectionKey key = (SelectionKey) it.next();

if (key.isReadable()) {

// 이미 연결된 클라이언트가 메시지를 보낸경우...

read(key);

}

// 이미 처리한 이벤트므로 반드시 삭제해준다.

it.remove();

}

}

} catch (Exception ex) {

// log(Level.WARNING ,"SimpleChatClient.startServer()", ex);

}

}

}class WriteThread extends Thread {


private SocketChannel sc = null;


public WriteThread(SocketChannel sc) {

this.sc = sc;

}


public void run() {


ByteBuffer buffer = ByteBuffer.allocateDirect(1024);

String message =null;


try {

sleep(400); //소켓 연결하는 동안 잠깐 대기. 

while (!Thread.currentThread().isInterrupted()) {

sleep(5); //초당 프레임 체크 

buffer.clear();

message=singletonMove.movement;  //싱글톤으로 가져온 변수값 


if (message.length() <2 || message==null) {

//Log.e("============","===============error NULL"+message);


} else {

if (message.equals("quit")|| message.equals("shutdown")) {

System.exit(0);

}


buffer.put(message.getBytes());

buffer.flip();

sc.write(buffer);

message = null;

}

}


} catch (Exception ex) {

ex.printStackTrace();

System.exit(0);

// log(Level.WARNING, "MyThread.run()", ex);

} finally {

System.exit(0);

clearBuffer(buffer);

}

}

}


private void read(SelectionKey key) {


// SelectionKey로부터 소켓채널을 얻어온다.


SocketChannel sc = (SocketChannel) key.channel();

// ByteBuffer를 생성한다.

ByteBuffer buffer = ByteBuffer.allocateDirect(1024);

int read = 0;


try {


// 요청한 클라이언트의 소켓채널로부터 데이터를 읽어들인다.

read = sc.read(buffer);


// info(read + " byte를 읽었습니다.");

} catch (IOException ex) {

try {

sc.close();

} catch (IOException ex1) {


}

}


buffer.flip();


String data = new String();


try {

data = decoder.decode(buffer).toString();

} catch (CharacterCodingException ex) {


// log(Level.WARNING, "SimpleChatClient.read()", ex);

}


System.out.println("Message - " + data);


// 버퍼 메모리를 해제한다.

clearBuffer(buffer);

}


private void clearBuffer(ByteBuffer buffer) {


if (buffer != null) {

buffer.clear();

buffer = null;

}


}


}


Posted by k1rha
2012. 7. 26. 03:04


MainActivity 에서 Thread 를 돌려 변경되는  작업들을 다시 MainActivity 에서 참조하여 UI를 변경하고 싶을 때, 

MainActivity 에 update() 를 두고 MainActivity 를 넘기게 되면 디버깅시에는 잘 동작하는 것이 실제로 동작 시키면 잘 안되는 현상이 일어난다. 


이는 UI Thread는 외부 Thread 에서 참조할 수가 없기 때문에 일어나는 현상이다. 

이를 해결 하기 위해서 Handler 라는 개념을 사용 하게 된다. 

(C# 에서는 델리게이트라는 위임의 역할을 맡아주는 것이 따로 있다.)


핸들러란?


 시스템은 사용자가 작성한 UI에서 빠른 응답을 요구하고 있다.

만약  이상의 응당이 없을 경우 최악의 경우 작성된 프로그램이 강제로 종료가  경우도 발생할 수 있다.

이런 상황을 방지하기 위해서  오래걸리는 작업이 필요한 경우 두가지의 방법으로 해결을 할 수 있다.

첫번째는 시간이 오래걸리는 작업은 서비스로 만들어서 처리하는 방법

 새로운 쓰레드로 처리를 하는 방법


두번째 방법으로  생성해서 데이터 처리등의 시간이 오래걸리는 작업을 지원하기 위한 클래스가 존재하는데  핸들러(Handdler)이다.


간략하게 요약을 해보면

  • 백그라운드  생성을 위한 가장 유연한 방법이다.
  • 인스턴스 생성시 자동으로 안드로이드가  관리한다.
  • 메시지를 전달받게 되면 호출 되는 handlerMessage()에 실제 처리내용을 
  • post(), postDelayed()를 통해서 인자로 실행하고 자하는 Runnable객체를 전달할 수 있다.
  • View단에도 Runnable객처를 인자로 전달가능하고 이럴경우 코드가 심플해지는 경우도  있지만 Handler를 추천한다.


메시지(Message)란?


UI등에서 실제로 처리를 담당하는  데이터를 전송하거나 작업을 요청하기 위해서 전달하는 객체이다.


  • 핸들러로 전달되는 객체이다.
  • 전달된 메시지는 메시지 Queue를 통해서 핸들러가  사용한다.
  • 메시지를 전달하기 위해선 핸들러의 obtainMessage()호출해서 메시지 풀의 메시지를  전달해야한다.
  • 메시지를 전달하기 위해서는 sendMessage() 등을 사용한다.

메시지 전달 방식의 종류

  • sendMessage() - 큐의  메시지를 삽입한다.
  • sendMessageAtFrontQueue() - 큐의 맨앞에 메시지를 삽입한다.(우선처리)
  •  - 장비기동시간을 기준으로 삽입한다.(SystemClock.uptimeMillis()참고)
  • sendMessageDelayed() - 특정시간만큼 지연 삽입한다.


Posted by k1rha
2012. 7. 18. 21:08

구조체처럼 변수를 한번에 실어 나르고 싶지만, 그 타입이 불특정할때.. 객체 자체를 전송시키지만, 그값이 데이터 베이스나 그런곳에 들어가기엔 정규화되어 잇지 않을때 사용하기 좋은것이 바로 JSON 방식이다.


JSON 방식은 크게 2개가 묶여 있다.


Array 와 Object 이 두가지가 그것이다.


배열은 [ 1, 2, 3 ] 으로 표현되며 객체는 {"keyword":"value,"keyword2","value2"} 식으로 표현되는데,

이 array 안에 object 를 담애 낼수 있으며 , object 안에 array를 담아 낼 수도 있다.


간단하게 배열 안에 여러개의 변수가 담긴 Obejct 를 넣는 방법을 예시로 들어보겠다.

넣고자 하는 문자열은 다음과 같다.


[{"key3":"test3","key2":"test2","key1":"test"}] 


위에 설명에 따라 한행의 배열안에 OBJECT가 들어가 있고 그 오브젝트는 key3 key2 key1 로 들어가 있다. 각 키는 하나의 값을 가지고 있다.


[ example ]

import org.json.JSONArray;

import org.json.JSONException;

import org.json.JSONObject;

public class Json {

String json_ex = "[{\"key01\":\"aaaa\",\"key02\":\"bbbb\"}]";

void jsonCombine(){

JSONArray array = new JSONArray();

JSONObject obj = new JSONObject();

try{

obj.put("key1", "test");

obj.put("key2", "test2");

obj.put("key3", "test3");

array.put(obj);

Log.e("json parser", "=================="+array.toString());

}catch(Exception e){

Log.e("JSON Combine",":::::array Error "+e.toString());

}

}

void jsonParsor(){

String a=null;

String b=null;

try {

JSONArray ja  = new JSONArray(json_ex);

JSONObject jsonRoot =ja.getJSONObject(0); //0번째 라인...다중 배열시엔 for문

a = jsonRoot.getString("key01");

b = jsonRoot.getString("key02");

} catch (JSONException e1) {

e1.printStackTrace();

}

}


Posted by k1rha
2012. 7. 10. 17:37

[android] 영상처리 NDK 단에서 처리하여 리턴하기 (Image Processing in NDK)


서론 : 이 과정은 아래글인 JNI 설정법을 먼저 읽어두고 숙지한 상태로 진행 한다는 것을 전제로 하겠다. 

안드로이드에서 카메라색상 값을 추출하면 그 값은 YUV 값으로 추출된다. 하지만 영상처리를 위해서는 YUV값보단 RGB 값으로 도될려주는 것이 더 간편하다.


때문에 안드로이드에서 YUV 값을 RGB 값으로 변환 하여야하는데, 인터넷에서 돌아다니는 소스는 대부분 자바단에서 YUV->RGB 로의 변환이 많다. 이렇게 될 경우 실시간 이미지 프로세싱을 하게되면 속도가 NDK 보다 느려짐이 발생 할 수 있다.


때문에 YUV 값을 C언어단으로 보내어 RGB 처리를 한후 이미지 프로세싱을 하고 그결과 값을 리턴하는 식의 진행을 하게 되었다. 


순서는 다음과 같다 


1. native 메소드를 생성 후 C언어 헤더 만들기.

2. 그 헤더의 전처리 함수를 이용하여 .c 파일의 RGV 값 추출 코드 만들기.

3. 포인터 형태로 RGB 값을 리턴하기. 

4. 리턴한 값을 비트맵으로 만들기.

5. ImageView 로 띄우기.


1.native 메소드를 생성 후 C언어 헤더 만들기.


맨아레 코드처럼 private native void 형으로 함수명을 선어해 주면 javah 명령어를 통해 C언어와 연결되는 헤더가 만들어 지게 된다. 


이 헤더 값을 기반으로 C언어단에서 Byte 값을 입력받아, Bitmap 파일로 리턴해 주는 함수를 짜야한다 사용한 코드는 너무 길어서 맨 아래 source_1 로 첨부 하도록 하겠다. (흐름이 깨지지 않도록)


그리고 android.mk 파일을 수정 해야 한다. (자세한것은 JNI 사용법 문서를 참조)

android.mk 파일 내용은 다음과 같다.(기존 JNI 문서보다 LOCAL_LDLIBS 환경변수가 추가되는데, 필자도 어떤 설정인지 파악을 하진 못했다.


위와같이 LOCAL_LDLIBS 환경변수를 추가적으로 주고 LOCAL_MODULE 에는 만들어질 라이브러리명, LOCAL_SRC_FILES 는 C파일명 을 설정해서 .c .h android.mk 파일 세개를 JNI 폴더로 옴긴 뒤 빌드 한다.


이후 자바단에서 그 함수(메소드)를 이용하여 비트맵을 전송시킨다. (콜백 함수를 이용한다) 


위그림에서  초록색 박스가 필자의 블로그에서 소개했던 기본 [Camera 를 surface 뷰로 띄우기] 에서 변경된 부분이다.

callback 함수에서 mainActivity의 ImageView 값을 변경해 주기 위해서 MainActivity를 인자값으로 넘겨서 실행 시키게 했다.


아래 빨간색 네모박스는 mHolder에 callback 함수를 추가시키는 부분이다. 별다른 내용은 없다.

그리고 노란색 박스는 콜백함수의 구현부이다.


중요한 부분은 파란색 박스의 prBitmap 부분이다. 이부분에서 빈 bitmap 파일을 ARGB8888 형태로 선언해두고, 리턴한 바이트 값을 비트맵으로 받아올 준비를 한다. 


그리고 그 윗부분 노란색 박스 아래에 OnPreviewFrame 부분인데, 이 메소드가 선언되면 인자값으로 카메라 값과 그 카메라의 바이트가 전송되는데 이값이 YUV 값이 되는것이다. (이 부분때문에 이해하느라 고생함)


이값을 바탕으로 native 함수인 YUB420SPtoRGB8888NEW 함수에 data를 넣고 prBitmap 으로 리턴 받게 된다.

이값을 이미지뷰에 띄워주면 된다.


결론.

이렇게 카메라 값을 native 에 넣었고 RGB로 변환 후 꺼냈으므로, 그사이에 영상처리 기술을 얼마든지 넣을 수 있다.

필요한 부분은 차차 구현해 나가고 결국엔 비트맵으로 출력해오면된다. 


중요한건 속도인데, 16~40프레임 선에서 처리가 된다. 


source_1 

 /**************************************************************************

* implements by Jeon (poemer@kut.ac.kr) 2012.05.13

* interface method Android - JNI - Native C 

* YUV420SP Converts to RGB 8888 Format

* this routines are optimized on ARM based CPU

***************************************************************************/

/*android specific headers*/

#include <jni.h>

#include <android/log.h>

#include <android/bitmap.h>


/*standard library*/

#include <time.h>

#include <math.h>

#include <limits.h>

#include <stdio.h>

#include <stdlib.h>

#include <inttypes.h>

#include <unistd.h>

#include <assert.h>

#include <string.h>


#include "edge_smash_CameraView.h"

#define LOG_TAG "YUV2RGB_Native"

#define LOG_LEVEL 10

#define LOGI(level, ...) if (level <= LOG_LEVEL) {__android_log_print(ANDROID_LOG_INFO, LOG_TAG, __VA_ARGS__);}

#define LOGE(level, ...)if (level <= LOG_LEVEL) {__android_log_print(ANDROID_LOG_ERROR, LOG_TAG, __VA_ARGS__);}

inline int32_t toInt(jbyte pValue) {

return (0xff & (int32_t) pValue);

}

inline int32_t max(int32_t pValue1, int32_t pValue2) {

if (pValue1 < pValue2) {

return pValue2;

} else {

return pValue1;

}

}

inline int32_t clamp(int32_t pValue, int32_t pLowest, int32_t pHighest) {

if (pValue < 0) {

return pLowest;

} else if (pValue > pHighest) {

return pHighest;

} else {

return pValue;

}

}

inline int32_t color(pColorR, pColorG, pColorB) {

return 0xFF000000 | ((pColorB << 6) & 0x00FF0000) | ((pColorG >> 2) & 0x0000FF00) | ((pColorR >> 10) & 0x000000FF);

}


JNIEXPORT void JNICALL Java_edge_smash_CameraView_NdkTest(JNIEnv * penv, jobject object, jint a){

LOGE(1, "AndroidBitmap_getInfo failed! error = %d",a);

// return a+11;

}

JNIEXPORT void JNICALL Java_edge_smash_CameraView_YUV420SPtoRGB8888NEW(JNIEnv * pEnv, jobject pObj, jobject pBitmap, jbyteArray pinArray) {

AndroidBitmapInfo lBitmapInfo;

uint32_t* lBitmapContent;

int lRet;

// LOGE(1, "**IN JNI bitmap converter IN!");

//1. retrieve information about the bitmap

    if ((lRet = AndroidBitmap_getInfo(pEnv, pBitmap, &lBitmapInfo)) < 0) {

        LOGE(1, "AndroidBitmap_getInfo failed! error = %d", lRet);

        return;

    }

if (lBitmapInfo.format != ANDROID_BITMAP_FORMAT_RGBA_8888) {

LOGE(1, "Bitmap format is not RGBA_8888!");

return;

}

//2. lock the pixel buffer and retrieve a pointer to it

    if ((lRet = AndroidBitmap_lockPixels(pEnv, pBitmap, (void**)&lBitmapContent)) < 0) {

        LOGE(1, "AndroidBitmap_lockPixels() failed! error = %d", lRet);

return;

    }

jbyte* lSource = (*pEnv)->GetPrimitiveArrayCritical(pEnv, pinArray, 0);

if (lSource == NULL) {

LOGE(1, "Source is null");

return;

}

//LOGE(1, "**Start JNI bitmap converter ");


int32_t lFrameSize = lBitmapInfo.width * lBitmapInfo.height;

int32_t lYIndex, lUVIndex;

int32_t lX, lY;

int32_t lColorY, lColorU, lColorV;

int32_t lColorR, lColorG, lColorB;

int32_t y1192;

// Processes each pixel and converts YUV to RGB color.

for (lY = 0, lYIndex = 0; lY < lBitmapInfo.height; ++lY) {

lColorU = 0; lColorV = 0;

// Y is divided by 2 because UVs are subsampled vertically.

// This means that two consecutives iterations refer to the

// same UV line (e.g when Y=0 and Y=1).

lUVIndex = lFrameSize + (lY >> 1) * lBitmapInfo.width;


for (lX = 0; lX < lBitmapInfo.width; ++lX, ++lYIndex) {

// Retrieves YUV components. UVs are subsampled

// horizontally too, hence %2 (1 UV for 2 Y).

lColorY = max(toInt(lSource[lYIndex]) - 16, 0);

if (!(lX % 2)) {

lColorV = toInt(lSource[lUVIndex++]) - 128;

lColorU = toInt(lSource[lUVIndex++]) - 128;

}

// Computes R, G and B from Y, U and V.

y1192 = 1192 * lColorY;

lColorR = (y1192 + 1634 * lColorV);

lColorG = (y1192 - 833 * lColorV - 400 * lColorU);

lColorB = (y1192 + 2066 * lColorU);

lColorR = clamp(lColorR, 0, 262143);

lColorG = clamp(lColorG, 0, 262143);

lColorB = clamp(lColorB, 0, 262143);

// Combines R, G, B and A into the final pixel color.

lBitmapContent[lYIndex] = color(lColorR,lColorG,lColorB);

}

}

LOGE(1, "**Start JNI bitmap converter %d",lColorR);


(*pEnv)-> ReleasePrimitiveArrayCritical(pEnv,pinArray,lSource,0);

AndroidBitmap_unlockPixels(pEnv, pBitmap);

LOGI(1, "end color conversion2");

}


Posted by k1rha
2012. 7. 9. 15:01

강좌 작성환경
SDK Version : Android SDK 1.6, release 2
ADT Version : 0.9.5

추후 SDK업데이트로 인해 글의 내용과 최신 SDK 내용간 차이가 있을 수 있습니다.


카메라를 이용하는 것에 대해 알아보기 전에, 카메라를 이용하면 필수로 사용하게 되는 카메라 프리뷰(Preview)를 표시할 때 사용하는 View인 SurfaceView에 대해 먼저 알아보도록 하겠습니다.

SurfaceView? 그게 뭐야?

SufraceView라는 이름에서 알 수 있듯이, TextView, ImageView처럼 컨텐츠를 표시할 수 있는 View 중 하나입니다. 하지만 이 SurfaceView는 다른 View들과는 달리 직접 SurfaceView가 컨텐츠를 표시하지 않습니다. 이건 좀 나중에 알아보기로 하고, 왜 하필이면 SurfaceView를 쓰는 걸까요?

일반적인 View는 화면에 뷰를 표시하는 연산과 기타 연산, 사용자와의 상호작용 처리 등이 모두 하나의 쓰레드에서 처리됩니다. 이것을 가장 잘 확인할 수 있는 예가 바로 ANR(Application Not Responding)입니다. ANR은 어플리케이션이 5초 이상 동작을 멈췄을 때, 조금 더 자세히 말하자면 GUI업데이트가 5초이상 멈췄을 때 발생하는데, 실제로 가끔씩 몇몇 어플리케이션에서 연산이 늦어지면 GUI 업데이트가 늦어지며 ANR이 발생하는 것을 볼 수 있습니다. 즉, GUI 업데이트와 다른 연산이 같은 쓰레드 내에서 처리되기에 이런 현상이 발생하는것이죠.

그런데, 우리가 처리해야할 것은 카메라 프리뷰, 즉 실시간으로 화상을 카메라로부터 받아서 1초에 몇십프레임 이상의 속도로 화면을 업데이트해야 하는 동작입니다. 그렇기에 만약 SurfaceView를 쓰지 않으면 뷰를 업데이트하는데 쓰레드의 자원을 모두 써서 어플리케이션의 정상적인 동작을 보장하기 어렵죠.

그래서 등장한 것이 바로 SurfaceView입니다. SurfaceView는 화면 업데이트를 백그라운드 쓰레드로 수행하여 어플리케이션의 자원을 잠식하지 않고 원활하게 뷰를 업데이트해줍니다. 뿐만 아니라 SurfaceView는 OpenGL을 통한 가속이 지원되어 원활한 3D그래픽 표현도 가능합니다. (GLSurfaceView)


SurfaceView의 구조

ImageView나 TextView는 뷰 자체가 바로 컨텐츠를 표시하지만, SurfaceView는 조금 복잡한 구조를 가지고 있습니다.
SurfaceView 자체는 하나의 "틀" 역할만 하고, 실제로 컨텐츠가 표시되는 곳은 SurfaceView 내의 Surface 객체입니다. 


위의 그림에서 알 수 있듯이, SurfaceHolder객체가 실제 Surface에 접근하여 화면을 처리해주는 구조를 가지고 있습니다. SurfaceHolder라는 이름 그대로, Surface 객체를 잡고(Hold) 관리해주는 것이라 보면 됩니다.

그럼, 이제 본격적으로 코드를 보면서 진행해보도록 하겠습니다. 아래의 코드는 API Demos의 CameraPreview 코드입니다.
우선 SurfaceView 부분부터 보도록 하겠습니다.


01.class Preview extends SurfaceView implements SurfaceHolder.Callback {
02.SurfaceHolder mHolder;
03. 
04.Preview(Context context) {
05.super(context);
06. 
07.// SurfaceHolder.Callback을 설정함으로써 Surface가 생성/소멸되었음을
08.// 알 수 있습니다.
09.mHolder = getHolder();
10.mHolder.addCallback(this);
11.mHolder.setType(SurfaceHolder.SURFACE_TYPE_PUSH_BUFFERS);
12.}
13. 
14.public void surfaceCreated(SurfaceHolder holder) {
15. 
16.}
17. 
18.public void surfaceDestroyed(SurfaceHolder holder) {
19. 
20.}
21. 
22.public void surfaceChanged(SurfaceHolder holder, int format, int w, int h) {
23. 
24.}
25. 
26.}

SurfaceView를 사용하기 위해서는 SurfaceView 객체를 직접 사용하는 것이 아니라 SurfaceView를 상속하며, SurfaceHolder.Callback을 구현하는 클래스를 생성해야 합니다.  생성자 부분을 보도록 하죠.

01.class Preview extends SurfaceView implements SurfaceHolder.Callback {
02.SurfaceHolder mHolder; // 1
03. 
04.Preview(Context context) {
05.super(context);
06. 
07.// SurfaceHolder.Callback을 설정함으로써 Surface가 생성/소멸되었음을
08.// 알 수 있습니다.
09.mHolder = getHolder(); // 2
10.mHolder.addCallback(this); // 3
11.mHolder.setType(SurfaceHolder.SURFACE_TYPE_PUSH_BUFFERS);
12.}

우선 클래스의 멤버로 SurfaceHolder 객체인 mHolder 객체를 가지고 있는 것을 확인할 수 있습니다. 이 객체를 통해 실제로 컨텐츠가 표시되는 영역인 Surface를 관리할 수 있습니다. (1)

그 다음, mHolder에 getHolder()메소드를 통해 현재 SurfaceView의 SurfaceHolder 인스턴스를 연결해주고 있는 것을 확인할 수 있습니다. 이로서, mHolder객체를 통해 이 SurfaceView의 Surface에 접근할 수 있게 되었습니다. (2)

다음은 콜백(Callback)을 설정하는 모습입니다. 이 과정은 SurfaceHolder와 SurfaceView를 연결시켜주는 과정입니다. 이로써 Surface가 변경됨을 SurfaceHolder(mHolder)를 거쳐 최종적으로 SurfaceView에서도 알 수 있게 되었습니다. (3)

그 다음은 SurfaceView의 유형을 설정해주는데, 위의 옵션은 버퍼가 없이 화면을 표시할 때 사용합니다. 카메라 프리뷰는 별도의 버퍼가 없어도 되니 이 옵션을 사용합니다.

그 다음으로 SurfaceView.Callback에서 구현하는 메소드들을 확인할 수 있습니다.

01.public void surfaceCreated(SurfaceHolder holder) {
02. 
03.}
04. 
05.public void surfaceDestroyed(SurfaceHolder holder) {
06. 
07.}
08. 
09.public void surfaceChanged(SurfaceHolder holder, int format, int w, int h) {
10. 
11.}
12. 
13.}

위의 메소드들은 마치 액티비티의 생애주기와 비슷한 형태를 하고 있습니다. 실제로, SurfaceView 자체가 3D 그래픽 등 자원을 많이 사용하기에 사용하지 않을 때 (화면에서 보이지 않을 때) 적절한 처리를 하는 것이 매우 중요하므로 위의 메소드에서 그 작업을 처리해주게 됩니다.

그럼 여기까지 SufraceView에 대한 기본적인 것들에 대해 알아보았으니 다음 글에서는 실제로 Camera 객체를 얻어와 Preview를 표시하는 것까지 알아보도록 하겠습니다. :)


강좌 작성환경
SDK Version : Android SDK 1.6, release 2
ADT Version : 0.9.5

추후 SDK업데이트로 인해 글의 내용과 최신 SDK 내용간 차이가 있을 수 있습니다.

지난 글에 이어서 이번 글에서는 카메라 프리뷰를 SurfaceView에 표시하는 방법에 대해 알아보도록 하겠습니다.
카메라 프리뷰 화면이 우리가 만든 SurfaceView에 표시되어야 하므로, SurfaceView를 완전하게 구현해 주어야 합니다.
아래는 우리가 만든 SurfaceView를 상속한 클래스, Preview 클래스의 전체 코드입니다.


01.class Preview extends SurfaceView implements SurfaceHolder.Callback {
02.SurfaceHolder mHolder;
03.Camera mCamera;
04. 
05.Preview(Context context) {
06.super(context);
07. 
08.// SurfaceHolder.Callback을 설정함으로써 Surface가 생성/소멸되었음을
09.// 알 수 있습니다.
10.mHolder = getHolder();
11.mHolder.addCallback(this);
12.mHolder.setType(SurfaceHolder.SURFACE_TYPE_PUSH_BUFFERS);
13.}
14. 
15.public void surfaceCreated(SurfaceHolder holder) {
16.// Surface가 생성되었다면, 카메라의 인스턴스를 받아온 후 카메라의
17.// Preview 를 표시할 위치를 설정합니다.
18.mCamera = Camera.open();
19.try {
20.mCamera.setPreviewDisplay(holder);
21.catch (IOException exception) {
22.mCamera.release();
23.mCamera = null;
24.// TODO: add more exception handling logic here
25.}
26.}
27. 
28.public void surfaceDestroyed(SurfaceHolder holder) {
29.// 다른 화면으로 돌아가면, Surface가 소멸됩니다. 따라서 카메라의 Preview도
30.// 중지해야 합니다. 카메라는 공유할 수 있는 자원이 아니기에, 사용하지 않을
31.// 경우 -액티비티가 일시정지 상태가 된 경우 등 - 자원을 반환해야합니다.
32.mCamera.stopPreview();
33.mCamera = null;
34.}
35. 
36.public void surfaceChanged(SurfaceHolder holder, int format, int w, int h) {
37.// 표시할 영역의 크기를 알았으므로 해당 크기로 Preview를 시작합니다.
38.Camera.Parameters parameters = mCamera.getParameters();
39.parameters.setPreviewSize(w, h);
40.mCamera.setParameters(parameters);
41.mCamera.startPreview();
42.}
43. 
44.}

이전 글에서는 아직 surfaceCreated, surfaceDestroyed, surfaceChanged 메소드가 구현되어있지 않았는데, 여기에서 이 메소드들까지 구현되어 있는 것을 확인할 수 있습니다. 하나하나씩 차근차근 살펴보도록 하겠습니다.

1.class Preview extends SurfaceView implements SurfaceHolder.Callback {
2.SurfaceHolder mHolder;
3.Camera mCamera; // Camera객체 추가

우선, SurfaceView에 카메라에서 받은 영상을 표시하기 위해 Camera객체가 추가된 것을 확인할 수 있습니다.

01.public void surfaceCreated(SurfaceHolder holder) {
02.// Surface가 생성되었다면, 카메라의 인스턴스를 받아온 후 카메라의
03.// Preview 를 표시할 위치를 설정합니다.
04.mCamera = Camera.open();
05.try {
06.mCamera.setPreviewDisplay(holder);
07.catch (IOException exception) {
08.mCamera.release();
09.mCamera = null;
10.// TODO: add more exception handling logic here
11.}
12.}
그 다음, surfaceCreated 메소드의 구현부입니다.
마치 액티비티의 생애주기 메소드 중 하나인 onCreate(Bundle)의 형태와 유사합니다. 이 메소드를 구현함으로써 SurfaceView가 생성되었을 때, 즉 "화면에 표시" 될 때 해야 할 동작을 처리할 수 있습니다.

여기에서는 카메라 객체를 받아와 카메라로부터 영상을 받을 수 있도록 초기화해주는 동작을 수행하고 있습니다. (Camera.open()) 그 다음, setPreviewDisplay(holder)메소드를 통해 카메라로부터 받은 프리뷰 영상을 어디에 표시해줄지 지정하고 있습니다.

앞의 글에서 SurfaceView는 SurfaceView 자체가 내용을 표시하는 것이 아니라 내부의 SurfaceHolder를 통해 최종적으로는 Surface라는 객체 위에 그 내용을 표시한다고 하였는데, 위의 경우는 아래와 같이 카메라의 영상이 처리된다고 볼 수 있습니다.


그 다음을 한번 보도록 하죠. 예외처리 부분이군요.

1.catch (IOException exception) {
2.mCamera.release();
3.mCamera = null;
4.// TODO: add more exception handling logic here
5.}

오류가 발생해서 프리뷰 화면을 제데로 표시하지 못했다면, release() 메소드를 사용하여 카메라의 자원을 다시 반환하는 것을 확인할 수 있습니다. 카메라는 여러 곳에서 공유할 수 있는 자원이 아니기에 카메라 객체의 사용이 끝났다면 위와 같이 release() 메소드를 사용하여 자원을 반환해야 합니다. 그렇지 않으면 다른 문제가 발생할 수 있습니다. :(

1.public void surfaceDestroyed(SurfaceHolder holder) {
2.// 다른 화면으로 돌아가면, Surface가 소멸됩니다. 따라서 카메라의 Preview도
3.// 중지해야 합니다. 카메라는 공유할 수 있는 자원이 아니기에, 사용하지 않을
4.// 경우 -액티비티가 일시정지 상태가 된 경우 등 - 자원을 반환해야합니다.
5.mCamera.stopPreview();
6.mCamera = null;
7.}

그 다음, surfaceDestroyed 메소드 구현부입니다. 이 메소드는 SurfaceView가 더이상 화면에 표시되지 않을 때 호출됩니다. 일반적인 View는 액티비티가 일시정지 상태가 된 경우에도 계속 화면에 그 내용을 표시하지만, SurfaceVIew의 경우 표시하는 내용이 다른 뷰에 비해 복잡하기에 굳이 액티비티가 비활성 상태일때 그 내용을 표시할 이유가 없겠죠. 

따라서, stopPreview() 메소드를 사용하여 카메라의 프리뷰 영상을 표시하는 것을 중단하고, 카메라 객체를 소멸시킵니다.

1.public void surfaceChanged(SurfaceHolder holder, int format, int w, int h) {
2.// 표시할 영역의 크기를 알았으므로 해당 크기로 Preview를 시작합니다.
3.Camera.Parameters parameters = mCamera.getParameters(); // (1)
4.parameters.setPreviewSize(w, h); // (2)
5.mCamera.setParameters(parameters); // (3)
6.mCamera.startPreview();
7.}

다음은 surfaceChanged메소드입니다. 이 메소드는 surfaceCreated()메소드 호출 이후에 호출되는 메소드로, Surface의 크기에 따라 실질적으로 어떻게 내용을 표시할지를 처리해주는 메소드입니다.

여기에서는 카메라의 여러 설정값들을 담고 있는 parameters를 받아온 후(1), 프리뷰의 크기를 지정합니다.(2) 그 후, setParameters()에 방금 카메라 프리뷰 크기를 수정한 parameter 객체를 인자로 넘겨줌으로써 카메라 객체에서 프리뷰 영상을 표시할 영역의 크기를 설정해주게 됩니다. (3)

이 과정이 모두 끝났다면, startPreview() 메소드를 통해 최종적으로 카메라 프리뷰 영상을 표시해주게 됩니다.

여기까지 해서 SurfaceView 부분의 구현이 모두 끝났습니다. 실질적으로 카메라의 영상을 처리하는 부분은 여기에서 끝났으므로, 남은 것들은 액티비티를 구성하고, 이 뷰의 객체를 생성한 후 액티비티의 화면으로 표시해주는 과정이 남았습니다. 
액티비티 구현을 보도록 하죠.

01.public class CameraPreview extends Activity {   
02.private Preview mPreview;
03. 
04.@Override
05.protected void onCreate(Bundle savedInstanceState) {
06.super.onCreate(savedInstanceState);
07. 
08.// Hide the window title.
09.requestWindowFeature(Window.FEATURE_NO_TITLE);
10. 
11.// Create our Preview view and set it as the content of our activity.
12.mPreview = new Preview(this);
13.setContentView(mPreview);
14.}
15. 
16.}
다른 특이한 것들은 별로 없고, 액티비티의 이름을 표시해주는 타이틀바를 표시하지 않기 위해 requestWindowFeature(Window.FEATURE_NO_TITLE) 를 사용하는 것을 확인할 수 있습니다.

자 이제 거의 다 끝났습니다. 카메라를 사용하기 위해서는 권한이 필요하므로, 메니페스트 파일에 권한을 추가합니다.


위와 같이 메니페스트 파일의 Permission 탭으로 이동한 후, Add..버튼을 누릅니다.


Uses Permission을 선택한 후, OK 버튼을 클릭합니다.


새로 Uses Permission 항목에 카메라 사용 권한인 android.permission.CAMERA 를 선택해주면 권한 추가가 완료됩니다.

그리고, 메니페스트 파일을 열어 수동으로 <uses-feature android:name="android.hardware.camera"/> 를 추가합니다.

 
이 기능은 SDK버전을 선언하는 것과 비슷하게 카메라가 없는 장치에서는 아예 어플리케이션이 설치가 되지 않도록 하는 옵션입니다. 안드로이드를 사용하는 장치가 한두가지가 아니므로 이런 식으로 각 장치의 특성에 맞도록 적절히 조치를 해 주는 것이죠.

마지막으로, 액티비티를 landscape 모드로 표시하기 위해 메니페스트 파일을 열어 Application 탭으로 간후,


Screen orientation을 landscape로 바꾸어줍니다. 이렇게 하면 이 액티비티는 항상 landscape 모드로 표시되게 됩니다.


이 과정이 모두 끝났다면, 어플리케이션을 실행시켜봅시다. 카메라 미리보기가 잘 표시되는 것을 확인할 수 있습니다 :)

Posted by k1rha
2012. 7. 9. 13:36

[출처 : http://blog.naver.com/khs7515?Redirect=Log&logNo=20156449363 ] 


-----------------------------------------------------------------------------------------------------


이분 블로그를 앞으로 많이 이용할듯하다. 은근히 섬세한 설명에 이유까지 잘설명됨 


--------------------------------------------------------------------------------------------------


SurfaceView는 View보다 구조상 복잡하긴 하지만 성능이 더 좋기 때문에 게임, 또는 렌즈에 비치는 모습을 휴대폰 화면에

   빠르게 보여주기 위해서 사용된다.

# 예를 들어 설명하자면 100개의 물건을 옮기는데 View는 1개씩 옮겨다 놓지만 SurfaceView는 100개를 실어서 한번에 옮기는 형태랄까

# 화면이 갱신되는 동안 모든 객체의 정보를 담아두었다가 보여주는 것을 반복한다.

# 다음 예제는 임의로 움직이는 공을 무한하게 만들어서 SurfaceView가 어느 정도까지 버틸 수 있는가를 실험해보는 것이다.

# 모토로이 기준 1,500개정도가 되면 속도가 현저히 늦어지는 것을 볼 수 있었다.


******************************************** MainActivity.java *************************************************

package test.surfaceview.test2;


import android.app.Activity;

import android.os.Bundle;


public class MainActivity extends Activity {

    /** Called when the activity is first created. */

    @Override

    public void onCreate(Bundle savedInstanceState) {

        super.onCreate(savedInstanceState);

        setContentView(new GameView(this));

    }

}

******************************************** GameView.java *************************************************

package test.surfaceview.test2;


import android.content.Context;

import android.util.Log;

import android.view.SurfaceHolder;

import android.view.SurfaceView;


/*

 * [[ 빠른 그래픽 처리를 위한 SurfaceView 사용하기 ]]

 * 1. surfaceview 클래스를 상속받는다.

 * 2. surfaceHolder.callback인터페이스를 구현한다.

 * 3. 인터페이스의 추상메소드를 오버라이딩 한다.

 * 4. 백그라운드에서 작업할 스레드를 만들어서 SurfaceHolder 객체를 넘겨준다.

 * 5. 스레드에서는 surfaceholder 객체를 이용해서 그래픽 작업한다.

 * 6. 

 */


//생성자 1개짜리는 View만 쓸때. 2개짜리는 다른것도 쓸때

public class GameView extends SurfaceView implements SurfaceHolder.Callback{

Context context;

SurfaceHolder sHolder;

GameThread gameThread;

int width, height; //surfaceView가 차지하고 있는 실제 공간의 크기

public GameView(Context context) {

super(context);

this.context = context;

init(); //초기화

}

//초기화하는 메소드

public void init(){

//SurfaceHolder객체 얻어오기

sHolder = getHolder(); //surface가 holder를 가지고 있기 때문에 그냥 getholder하면 된다.

//콜백 객체 등록

sHolder.addCallback(this);

//스레드 객체 생성

gameThread = new GameThread(context, sHolder);

}

//뷰화면의 크기가 변화가 생겼을 때 호출되는 메소드(화면의 폭과 높이 정보가 인자로 들어온다.)

public void surfaceChanged(SurfaceHolder holder, int format, int width,

int height) {

Log.e("*********", "surfaceChanged()");

this.width = width;

this.height = height;

gameThread.setScreenSize(width, height);

Log.e("*********", "width:"+width+" / height:"+height);

}

//뷰가 처음 만들어 질 때 호출되는 메소드

public void surfaceCreated(SurfaceHolder holder) {

Log.e("*********", "surfaceCreated()");

try {

//스레드를 시작시킨다.

gameThread.start();

} catch (Exception e) {

Log.e("********", "스레드 시작 시 에러 발생! 스레드를 다시 생성");

//에러 발생하면 재시작하기

restartThread();

}

}

//뷰가 파괴될 때 호출되는 메소드

public void surfaceDestroyed(SurfaceHolder holder) {

Log.e("*********", "surfaceDestroyed()");

//에러 없이 스레드를 안전하게 종료하기 위해

boolean tryJoin = true;

gameThread.stopForever(); //종료시 에러를 잡기 위한 핵심!

while(tryJoin){//join이 성공할때까지

try{

gameThread.join();

tryJoin=false;

}catch (Exception e) {

}

}

}

//스레드를 재시작하는 메소드

public void restartThread(){

//스레드 정지

gameThread.stopForever();

//스레드 비우고

gameThread = null;

//객체 다시 생성

gameThread = new GameThread(context, sHolder);

//화면의 폭과 높이 전달

gameThread.setScreenSize(width, height);

//스레드 시작

gameThread.start();

}

//스레드 일시정지하는 메소드

public void pauseThread(){

gameThread.pauseNResume(true);

}//일시 정지된 스레드를 재시작하는 메소드

public void resumeThread(){

gameThread.pauseNResume(false);

}

}


******************************************** GameThread.java *************************************************

package test.surfaceview.test2;


import java.util.ArrayList;

import java.util.Random;


import android.content.Context;

import android.graphics.Canvas;

import android.graphics.Color;

import android.graphics.Paint;

import android.graphics.Paint.Style;

import android.util.Log;

import android.view.SurfaceHolder;


public class GameThread extends Thread{


Context context;

SurfaceHolder sHolder; //핵심개체이며 화면의 구성에 대한 정보를 모두 가지고 있다.

boolean isRun = true;

boolean isWait = false;

Canvas canvas; //화면에 무언가를 그리기 위한 캔바스 객체(sHolder가 가지고 있다)

int width, height;

//랜덤한 수를 발생시키기 위해

Random ran = new Random();

//색을 저장할 배열

Paint[] paint = new Paint[5];

//원 객체를 저장할 배열

ArrayList<Circle> list = new ArrayList<Circle>();

//생성자

public GameThread(Context context, SurfaceHolder sHolder){

this.context = context;

this.sHolder = sHolder;

//원을 그릴 색 만들어서 배열에 저장하기

initPaint();

}

//화면의 폭과 높이를 전달바든ㄴ다

public void setScreenSize(int width, int height){

this.width = width;

this.height = height;

Log.e("*********", "width:"+width+" / height:"+height);

}

//빠르게 돌아가는 스레드에서 메소드를 실행하거나 멤버필드가 교환되는 작업을 하면 

//스레드 작업이 깨질수있기 때문에 동기화가 필요하다.

//스레드의 일시정지 혹은 재시작 하는 메소드

public void pauseNResume(boolean isWait){

synchronized (this) {

this.isWait = isWait;

notify();

}

}

//스레드 완전 정지하는 메소드

public void stopForever(){

synchronized (this) {

this.isRun = isRun;

notify();

}

}

//스레드 본체인 run메소드에서 그리는 작업을 해준다.

@Override

public void run() {

while(isRun){ //isRun의 초기 값이 true 이므로 기본적으로 무한 루프이다.

//Canvas객체 얻어오기

canvas = sHolder.lockCanvas();//화면정보를 다 담을때까지 화면을 잠궈놓는다.

//화면에 그리는 작업을 한다.

try{

//동기화 블럭에서 작업을 해야한다.

  synchronized (sHolder) { //그리기위한 모든 작업을 하는 곳

  //canvas 객체를 이용해서 반복적인 그리기 작업을 한다.

  canvas.drawColor(Color.WHITE);

  //반복문을 돌면서 원을 그린다

  for(int i=0 ; i < list.size() ; i++){

  //해당 인덱스의 원객체를 얻어온다.

  Circle cir = list.get(i);

  canvas.drawCircle(cir.x, cir.y, //원의 위치

  5,  //반지름

  paint[cir.color]); //원의 색

  }

  canvas.drawText("공의수:"+list.size(), 0, 20, paint[0]);

  //원 만들기(10번 돌때 한번의 확률로 원을 만들기 위해)

  //if(ran.nextInt(5)==0)

  makeCircle();

  //원 움직이기

  moveCircle();

}

}finally{

if(canvas!=null)//실제로 화면을 그리는 곳(while을 돌면서 화면을 덧그리기 때문에 invalidate가 필요하지 않다)

//잠근 화면을 풀고 작업한canvas 객체를 전달해서 화면을 그린다.

sHolder.unlockCanvasAndPost(canvas);

}

//스레드를 일시 정지 하기 위해 

if(isWait){ //isWait의 초기값은 false 이다

try {

synchronized (this) {

wait(); //notify할때까지 기다린다.(일시정지)

}

} catch (Exception e) {}

}//if

}//while

}//run

//페인트 객체를 생성해서 배열에 담는 메소드

public void initPaint(){

//paint 객체 생성해서 배열에 담기

Paint p1 = new Paint();

p1.setColor(Color.DKGRAY);

p1.setStyle(Style.FILL); // 원을 채우도록 

Paint p2 = new Paint();

p2.setColor(Color.RED);

p2.setStyle(Style.FILL); // 원을 채우도록

Paint p3 = new Paint();

p3.setColor(Color.GREEN);

p3.setStyle(Style.FILL); // 원을 채우도록

Paint p4 = new Paint();

p4.setColor(Color.BLUE);

p4.setStyle(Style.FILL); // 원을 채우도록

Paint p5 = new Paint();

p5.setColor(Color.YELLOW);

p5.setStyle(Style.FILL); // 원을 채우도록

//배열에 담는다.

paint[0]=p1;

paint[1]=p2;

paint[2]=p3;

paint[3]=p4;

paint[4]=p5;

}

//circle 객체를 만드는 메소드

public void makeCircle(){

//원의 위치

int x = ran.nextInt(width); //화면의 폭 안의 랜덤한 x지점

int y = ran.nextInt(height); //화면의 높이 안의 랜덤한 y지점

//원의 초기 속도

int speedX = ran.nextInt(10)-5;

int speedY = ran.nextInt(10)-5;

//원의 색

int color = ran.nextInt(5);

//Circle 객체를 생성해서 배열에 담는다

Circle cir = new Circle(x, y, color, speedX, speedY);

list.add(cir);

}

//circle객체를 움직이는 메소드

public void moveCircle(){

//반복문 돌면서 원 객체 움직이기

for(Circle cir : list){

cir.x += cir.speedX;

cir.y += cir.speedY;

//화면을 벗어나지 못하도록 처리

if(cir.x <= 0 || cir.x >= width){

//속도의 부호를 바꾸어서 반대방향으로 움직인다.

cir.speedX *= -1;

//바뀐 속도로 한번 움직여 준다.

cir.x += cir.speedX;

}

if(cir.y <= 0 || cir.y >= height){

//속도의 부호를 바꾸어서 반대방향으로 움직인다.

cir.speedY *= -1;

//바뀐 속도로 한번 움직여 준다.

cir.y += cir.speedY;

}

}

}

}


******************************************** Circle.java *************************************************

package test.surfaceview.test2;


public class Circle {

int x, y;

int color;

int speedX, speedY; //속도

public Circle(int x, int y, int color, int speedX, int speedY) {

super();

this.x = x;

this.y = y;

this.color = color;

this.speedX = speedX;

this.speedY = speedY;

}


}

Posted by k1rha
2012. 7. 6. 00:43

[   ]


0. JDK, Android SDK, 이클립스 다운로드 설치

(다른 페이지 참조)


1. Android NDK 다운로드 설치

(http://developer.android.com/tools/sdk/ndk/index.html)


2. 시그윈(cygwin) 다운로드 설치 

(http://www.cygwin.com/)

devel 전부 체크하고 설치가 맘편하다. (edit vim 포함)


3. C/C++ 라이브러리 함수를 호출하는 안드로이드(JAVA) 프로젝트


사전 작업 

cygwin 안에 NDK 폴더에서  이클립스에서 New andorid project 만든다.

그리고 한번 실행해준다.


$pwd

 /home/k1rha/android-ndk-r8/

$cd smash //내가 만든 프로젝트 


$ NdkMethod.java // 자바파일 생성

(클래스 명명 규칙에 어긋나는 JNI-function 라는 이름같은 것도 오류를 뱉어 낸다. )

------------------------------------------------------------------------

public class NdkMethod {

     static{

          System.loadLibrary("NdkMethodLibrary");

     }

     public native int NDKTest(int a, int b);

}

-------------------------------------------------------------------------


$pwd

$/home/k1rha/android-ndk-r8/PROJECT/smash/bin/classes/

(반드시 classess 에서 명령어를 쳐준다 이유는 헤더를 만들때는 폴더를 들어가는게 아니라 패키지명을 .으로 입력해줘야 하기 때문이다.)


$javah edge.smash.NdkMethod //여기서는 폴더가 .으로 패키지를 이어준다.


아래와 같은 파일이 만들어져 있다.

---------------------------edge_smash_NdkMethod.h--------------------------------------

/* DO NOT EDIT THIS FILE - it is machine generated */

#include <jni.h>

/* Header for class edge_smash_NdkMethod */


#ifndef _Included_edge_smash_NdkMethod

#define _Included_edge_smash_NdkMethod

#ifdef __cplusplus

extern "C" {

#endif

/*

 * Class:     edge_smash_NdkMethod

 * Method:    NDKTest

 * Signature: (II)I

 */

JNIEXPORT jint JNICALL Java_edge_smash_NdkMethod_NDKTest

  (JNIEnv *, jobject, jint, jint);


#ifdef __cplusplus

}

#endif

#endif


--------------------------------------------------------------------------------

우리는 여기서 JNIEXPORT jint JNICALL Java_edge_smash_NdkMethod_NDKTest
  (JNIEnv *, jobject, jint, jint);
  사용할수 있다.


4. JNI C/C++ 라이브러리 만들기


-------------------------------- edge_smash_NdkMethod.c ---------------------------------------

#include "edge_smash_NdkMethod.h"


JNIEXPORT jint JNICALL Java_edge_smash_NdkMethod_NDKTest(JNIEnv * pEnv, jobject object, jint a, jint b){


             return a+b;

}

---------------------------------------------------------------------------------

4.3 시그윈에서 *.so 빌드하기


이두개의 파일을 프로젝트 jni 폴더를 만든뒤 집어넣는다.


$pwd 

/home/k1rha/android-nkd-r8/PROJECT/smash


$mkdir jni

$ls

edge_smash_NdkMethod.c edge_smash_NdkMethod.h 


여기서 파일 Android.mk 파일을 작성해서 넣어준다


------------------------------ Android.mk --------------------------------------------


LOCAL_PATH := $(call my-dir)

include $(CLEAR_VARS)

LOCAL_MODULE  := NdkMethodLibrary

LOCAL_SRC_FILES := edge_smash_NdkMethod.cpp

include $(BUILD_SHARED_LIBRARY)


--------------------------------------------------------------------------------------


생성되는 모듈이름

LOCAL_MODULE  := tjssm_ndktest_NdkMethod

소스파일 이름

LOCAL_SRC_FILES := tjssm_ndktest_NdkMethod.cpp


$ls

edge_smash_NdkMethod.c edge_smash_NdkMethod.h  Android.mk


$pwd 

/home/k1rha/android-nkd-r8/PROJECT/smash

$ndk-build


위와같이 하고나면 libs so 파일이 생긴다


5. 라이브러리와 안드로이드 프로젝트 합치고 실행하기


1.System.loadLibrary("JNItest"); 를 사용하여 so 파일을 로딩한다.

이때 생성된 so 파일에는 제일 앞에 lib가 붙지만 loadLibrary()에 적어줄대는 lib를 빼고 넣어야한다.

그냥 생성된 .h 파일의 이름과 동일하게 넣으면 된다.


위의 순서대로 진행하면된다


Posted by k1rha
2012. 6. 14. 11:17


[출처 ] http://shonm.tistory.com/entry/JAVA-netty-%EB%B9%84%EB%8F%99%EA%B8%B0-%EC%9D%B4%EB%B2%A4%ED%8A%B8-%EB%B0%A9%EC%8B%9D-%EB%84%A4%ED%8A%B8%EC%9B%8C%ED%81%AC-%ED%94%84%EB%A0%88%EC%9E%84%EC%9B%8C%ED%81%AC-%EC%82%AC%EC%9A%A9%EB%B2%95-2-client


바로 이어서 client 로직을 올려 봅니다.

여기도 2개의 클래스 입니다.

첫 번째로 이벤트 핸들러 클래스 입니다.

package com.incross.netty;

import org.jboss.netty.buffer.ChannelBuffer;
import org.jboss.netty.buffer.ChannelBuffers;
import org.jboss.netty.channel.Channel;
import org.jboss.netty.channel.ChannelFuture;
import org.jboss.netty.channel.ChannelFutureListener;
import org.jboss.netty.channel.ChannelHandlerContext;
import org.jboss.netty.channel.ChannelStateEvent;
import org.jboss.netty.channel.ExceptionEvent;
import org.jboss.netty.channel.MessageEvent;
import org.jboss.netty.channel.SimpleChannelHandler;

public class SimpleClientHandler extends SimpleChannelHandler{


@Override
public void messageReceived(ChannelHandlerContext ctx,MessageEvent e){
ChannelBuffer response = (ChannelBuffer)e.getMessage();

byte[] message = response.array();

System.out.println("message:"+new String(message));
//response 메시지 찍어보기
if(new String(message).equals("server write test")){
//어떤 조건이 들어왔을 때 종료 되는 로직
Channel ch = e.getChannel();

ch.close();

System.out.println("closed");
}


}

//connection 연결 하면 바로 데이터 전송 하도록 하는 메소드
@Override
public void channelConnected(ChannelHandlerContext ctx,ChannelStateEvent e){

Channel ch = e.getChannel();
ChannelBuffer buf = ChannelBuffers.dynamicBuffer();

buf.writeBytes("1234a".getBytes());

ChannelFuture future = ch.write(buf);


future.addListener(new ChannelFutureListener(){
public void operationComplete(ChannelFuture future){
Channel ch = future.getChannel();
//ch.close();
//보내고 응답 안받고 끝내려면 close 해주면 됨
}
});
}


public void exceptionCaught(ChannelHandlerContext ctx,ExceptionEvent e){

e.getCause().printStackTrace();

Channel ch = e.getChannel();

ch.close();
}
}

두 번째로 클라이언트 쪽의 main 클래스 입니다.

package com.incross.netty;

import java.net.InetSocketAddress;
import java.util.concurrent.Executors;

import org.jboss.netty.bootstrap.ClientBootstrap;
import org.jboss.netty.channel.ChannelFactory;
import org.jboss.netty.channel.ChannelFuture;
import org.jboss.netty.channel.ChannelPipeline;
import org.jboss.netty.channel.ChannelPipelineFactory;
import org.jboss.netty.channel.Channels;
import org.jboss.netty.channel.socket.nio.NioClientSocketChannelFactory;

public class SimpleClient {

/**
* @param args
*/
public static void main(String[] args) {
// TODO Auto-generated method stub
int port = 8000;

ChannelFactory factory = new NioClientSocketChannelFactory(
Executors.newCachedThreadPool(),
Executors.newCachedThreadPool()
);

ClientBootstrap bootstrap = new ClientBootstrap(factory);

bootstrap.setPipelineFactory(new ChannelPipelineFactory() {

@Override
public ChannelPipeline getPipeline() throws Exception {
// TODO Auto-generated method stub

return Channels.pipeline(new SimpleClientHandler());
}
});


bootstrap.setOption("tcpNoDelay", true);
bootstrap.setOption("keepAlive", true);

ChannelFuture future = bootstrap.connect(new InetSocketAddress("localhost",port));


// 아래 부터는 connection 끊어 졌을 때를 위한 처리
future.awaitUninterruptibly();

if(!future.isSuccess()){
future.getCause().printStackTrace();
}

future.getChannel().getCloseFuture().awaitUninterruptibly();

factory.releaseExternalResources();
//connection 끊어졌을 때 자원 회수
}

}

Posted by k1rha
2012. 3. 21. 03:03
오늘은 안드로이드로 하이브리드앱을 만들어볼려고 찾아보았습니다.
일단 삽질끝에 처리를 하긴 했는대 기존에 있는 데이터들과는 조금 차이가 있습니다.
제가 진행했던 방법을 기록해두겠습니다.

제일 많이 참고 했던 사이트는 다음과 같습니다.
http://wiki.phonegap.com/w/page/16494774/Getting%20started%20with%20Android%20PhoneGap%20in%20Eclipse


# 1 기본적인 설치
JAVA JDK , Android SDK, Eclipse를 일단 설치를 했구요
설치 방법은 http://v.daum.net/link/8469722?CT=WIDGET 참고 하시면 됩니다.

여기서 골치아팠던게 루비인데요... 왜 루비가 필요한건지...머리가 아파왔습니다.
일단 Apache ANT http://ant.apache.org/index.html
Ruby http://rubyinstaller.org
다음과 같이 받아서 설치를 했습니다.

그리고 다음과 같이 환경설정을 처리 했습니다.
ANDROID_HOME, location of the Android SDK (for example: D:/android-sdk-windows)

ANT_HOME, location of Android Ant (for example: D:\apache-ant-1.8.1)

JAVA_HOME, location of the JDK (for example: C:\Program Files\Java\jdk1.6.0_20)

Path, folders where the operating system always looks when given a command (includes these, for example: C:\Ruby191\bin; D:\apache-ant-1.8.1\bin; C:\Program Files\Java\jdk1.6.0_20\bin; D:\android-sdk-windows\tools)


# 2 폰갭 설치
자 이제부터 폰갭을 받아서 처리 해야 하는대요

위키상에 내용을 보면 Git를 설치해서 내려 받아라고 되어 있습니다. 전 일단 받긴했는데..
머가 잘 안되더라구요
Git Bash (Windows only)
Visit: http://code.google.com/p/msysgit/downloads/list

계속 삽질한 위키상에 대해서 이야기 하겠습니다.
http://github.com/phonegap/phonegap-android 소스를 내려 받아라고 되어 있습니다.

그리고 전 막삽질을 해도 안되었던 부분입니다.

$ ruby ./droidgap classic "C:/Progra~1/Androi~1/android-sdk-windows" pgtest com.example.android.pgtest example/ "c:/Progra~1/Androi~1/phonegap-android/output"
In the above Windows example, the following environment settings were used:
android_sdk_path = "c:\Program Files\Android SDK\android-sdk-windows"
name = pgtest
path = "c:\Program Files\Android SDK\phonegap-android\output" (This is the output location where the example files were placed)
Example (Mac environment):
> cd phonegap-android
> ruby ./droidgap classic android/android-sdk-mac_86/ test_app com.mayerdan.testapp example/ ~/projects/test_droid_phonegap
Note if you get errors like:
BUILD FAILED
~/projects/phonegap-android/framework/build.xml:49: taskdef class com.android.ant.SetupTask cannot be found
followed by more errors like:
0:in `stat': No such file or directory - ~/projects/phonegap-android/framework/phonegap.jar
To fix this, just run the command with the full path to the android SDK
"sdk.dir=/andriod/android-sdk-mac_86" => "sdk.dir=/projects/andriod/android-sdk-mac_86"
Then run `ruby ./droidgap classic /Users/danmayer/projects/android/android-sdk-mac_86 test_app com.mayerdan.testapp example/ ~/projects/test_droid_phonegap` again.

다른 분들은 어떻게 하셨는지 모르겠는대 전 오늘 오전 내내 안되더라구요....


# 3 꼼수를 찾아내다...
그러다 다른 방법을 찾았습니다.
트루모바일 대표이사이신 정우진님과 구글 플러스로 어제 질문을 드렸던 부분이 있어서 찾아보았습니다.
그리고 약간 다른 방법으로 접근을 했습니다.

먼저 폰갭 사이트에서 다운을 받았습니다.
http://www.phonegap.com/download-thankyou

압축을 푸신후에 phonegap\Android 디렉토리에서 두 파일만 딱 추출했습니다.
phonegap-1.0.0.jar , phonegap-1.0.0.js

그리고 이클립스로 기존에 안드로이드 프로젝트 생성 하듯 진행을 합니다.

프로젝트 루트 폴더에 두 개의 새로운 폴더를 만들어 둡니다
/libs
/assets/www
Android 폴더 내에 있는 phonegap.js 파일을 /assets/www 로 복사한다.
phonegap.jar 파일을 /libs 폴더로 복사한다.
xml 폴더를 /res 로 복사한다.


프로젝트 아래의 /src 폴더에 있는 Project 메인 Java 파일({$프로젝트명}Activity.java – 예:DuraboysActivity.java)에서 몇 가지 수정을 하여야 한다.
class의 extend를 Activity 에서 DroidGap으로 변경한다.
setContentView(); 를 super.loadUrl("file:///android_asset/www/index.html");로 변경한다.
import com.phonegap.*;을 추가한다.

/libs 폴더에서 오른쪽 마우스 버튼을 클릭한 후 Build Paths/ > Configure Build Paths를 선택한다.
이때 표시되는 화면의 Libraries 탭에서 Add Jars 를 선택하여
Project에 phonegap-1.0.0.jar 를 추가한다.

AndroidManifest.xml를 찾아 오른쪽 마우스를 클릭한 후 Open with > Text Editor 를
선택하여 파일을 연다.
빨간색 부분을 추가 한다.

< ?xml version="1.0" encoding="utf-8"?>
<manifest xmlns:android="http://schemas.android.com/apk/res/android"
package="com.Dura.Demo"
android:versionCode="1"
android:versionName="1.0">
<supports-screens
android:largeScreens="true"
android:normalScreens="true"
android:smallScreens="true"
android:resizeable="true"
android:anyDensity="true"
/>
<uses-permission android:name="android.permission.CAMERA" />
<uses-permission android:name="android.permission.VIBRATE" />
<uses-permission android:name="android.permission.ACCESS_COARSE_LOCATION" />
<uses-permission android:name="android.permission.ACCESS_FINE_LOCATION" />
<uses-permission android:name="android.permission.ACCESS_LOCATION_EXTRA_COMMANDS" />
<uses-permission android:name="android.permission.READ_PHONE_STATE" />
<uses-permission android:name="android.permission.INTERNET" />
<uses-permission android:name="android.permission.RECEIVE_SMS" />
<uses-permission android:name="android.permission.RECORD_AUDIO" />
<uses-permission android:name="android.permission.MODIFY_AUDIO_SETTINGS" />
<uses-permission android:name="android.permission.READ_CONTACTS" />
<uses-permission android:name="android.permission.WRITE_CONTACTS" />
<uses-permission android:name="android.permission.WRITE_EXTERNAL_STORAGE" />
<uses-permission android:name="android.permission.ACCESS_NETWORK_STATE" />
<uses-sdk android:minSdkVersion="10" />

<application android:icon="@drawable/icon" android:label="@string/app_name" android:configChanges="orientation|keyboardHidden">
<activity android:name=".DemoActivity"
android:label="@string/app_name">
<intent-filter>
<action android:name="android.intent.action.MAIN" />
<category android:name="android.intent.category.LAUNCHER" />
</intent-filter>
</activity>

</application>
</manifest>


/assets/www 에 index.html 파일을 만든다
<!DOCTYPE HTML>
<html>
<head>
<title>PhoneGap</title>
<script type="text/javascript" charset="utf-8" src="phonegap.js"></script>
</head>
<body>
<h1>Hello World</h1>
</body>
</html>

여기까지하고 기존 안드로이드 빌드하듯 처리 한다.
그러면 헬로 월드를 만날수 있다.

일단 오전 삽질한 결과를 기록하는건대... 이게 정확하게 맞는건지는 잘 모르겠다.
잘못된 부분이 있음 연락 주시면 수정도 하고 저도 파악좀 했음 한다..

아직도 루비가 왜 필요한지를 모르겠다... 
Posted by k1rha
2012. 3. 21. 03:03

매니페스트에 등록 activity에 아래 추가

android:screenOrientation="portrait"

Posted by k1rha
2012. 3. 21. 03:02

 public void jsonparse() {
// String Result;
String Json = "[{\"Product\":\"Mouse\", \"Maker\":\"Samsung\", \"Price\":23000},"
+ "{\"Product\":\"KeyBoard\", \"Maker\":\"LG\", \"Price\":12000},"
+ "{\"Product\":\"HDD\", \"Maker\":\"Western Digital\", \"Price\":156000}]";
try {
String Result = "주문 목록\n";
JSONArray ja = new JSONArray(Json);
for (int i = 0; i < ja.length(); i++) {
JSONObject order = ja.getJSONObject(i);
Result += "제품명:" + order.getString("Product") + ",제조사:"
+ order.getString("Maker") + ",가격"
+ order.getInt("Price") + "\n";
}
// mResult.setText(Result);
} catch (JSONException e) {
// Toast.makeText(v.getContext(), e.getMessage(), 0).show();
}

}

Posted by k1rha
2012. 3. 21. 03:01

private OnTouchListener mTouchEvent = new OnTouchListener() {
public boolean onTouch(View v, MotionEvent event) {

Button b = (Button)v;
Button Blank = (Button) findViewById(R.id.Blank);

action = event.getAction();
int pureaction = action & MotionEvent.ACTION_MASK;
int pid = (action & MotionEvent.ACTION_POINTER_ID_MASK)
>> MotionEvent.ACTION_POINTER_ID_SHIFT;


if(action == MotionEvent.ACTION_DOWN){
if(t_flag==0){
t_left=b.getLeft();
t_right=b.getRight();
t_top=b.getTop();
t_bottom=b.getBottom();
t_flag=1;
}
}
else if (action == MotionEvent.ACTION_MOVE) {


mResult.setText("bLeft : "+b.getLeft()+"bTop : "+b.getTop()+"__Left : "+(int)event.getRawX()+"Top : "+(int)event.getRawY()+"\n");
b.layout((int)event.getRawX()-40,(int)event.getRawY()-250,(int)event.getRawX()+60,(int)event.getRawY()-150);


} else if (action == MotionEvent.ACTION_UP) {
t_flag=0;
b.layout(t_left,t_top,t_right,t_bottom);
//Toast.makeText(PuzzleActivity.this,"L:"+b.getLeft()+":"+event.getX()+"T"+b.getTop()+":"+event.getY()+"R"+b.getRight()+"B"+((int)event.getX()+100)+":"+b.getBottom()+":"+((int)event.getY()-100),Toast.LENGTH_LONG).show();
//Toast.makeText(PuzzleActivity.this,"L:"+event.getX(0)+"__"+event.getY(0),Toast.LENGTH_LONG).show();

On_Click.허용되지않은 태그 사용중(b);

// b.setBackgroundResource(R.drawable.backimg2);
//System.out.println("x=" + event.getX() + " y=" + event.getY());
}
return true;
}
};

Posted by k1rha
2012. 3. 21. 03:00

http://androiddeveloper.tistory.com/56

manifast 를 건들면된다

strings.xml 에서 바꿔줘도 간단한다. 

Posted by k1rha
2012. 3. 21. 02:59

//입력부분

SharedPreferences prefs = getSharedPreferences("k1rha", MODE_PRIVATE); //환경변수 이름
SharedPreferences.Editor ed = prefs.edit(); //설정

ed.putString("SPF_user_id", user_id); //키값설정.. (식별자임)
ed.commit();


//출력 부분
// SharedPreferences prefs = getSharedPreferences("k1rha", MODE_PRIVATE); //환경변수이름으로 가져오기
getUser = prefs.getString("SPF_user_id", ""); //식별자로 가져오기

Posted by k1rha